Introduction
Real-time communication has become an essential feature in modern web applications. Whether you're building a chat application, live notification system, collaborative workspace, or customer support platform, users expect instant updates without refreshing the page.
Microsoft SignalR simplifies real-time communication in ASP.NET Core applications by handling WebSocket connections and automatically falling back to other transport mechanisms when necessary.
What is SignalR?
SignalR is a library for ASP.NET that enables real-time web functionality. It allows the server to push updates to connected clients instantly.
Key Features
- Real-time communication
- Automatic transport fallback
- Bi-directional communication
- Group messaging
- Connection management
- Strong integration with ASP.NET Core
Common Use Cases
- Chat applications
- Live dashboards
- Notifications
- Multiplayer games
- Collaborative editing tools
Prerequisites
Before starting, ensure you have:
- .NET 8 SDK installed
- Visual Studio 2022 or Visual Studio Code
- Basic knowledge of ASP.NET Core
- JavaScript fundamentals
Step 1: Create a New ASP.NET Core Project
Create a new web application:
dotnet new webapp -n SignalRChatApp
cd SignalRChatApp
Run the application:
dotnet runStep 2: Add SignalR Package
Install the SignalR package:
dotnet add package Microsoft.AspNetCore.SignalRFor ASP.NET Core 3.0 and later, SignalR is included in the shared framework, but adding the package explicitly is acceptable.
Step 3: Create a Chat Hub
Create a folder named Hubs and add a file named ChatHub.cs.
using Microsoft.AspNetCore.SignalR;

namespace SignalRChatApp.Hubs
{
    public class ChatHub : Hub
    {
        public async Task SendMessage(string user, string message)
        {
            await Clients.All.SendAsync(
                "ReceiveMessage",
                user,
                message);
        }
    }
}
Understanding the Code
Hub is the base SignalR class.
SendMessage()receives messages from clients.Clients.All.SendAsync()broadcasts messages to all connected users.
Step 4: Register SignalR Services
Open Program.cs and register SignalR.
using SignalRChatApp.Hubs;

var builder = WebApplication.CreateBuilder(args);

builder.Services.AddRazorPages();
builder.Services.AddSignalR();

var app = builder.Build();

app.UseStaticFiles();
app.UseRouting();

app.MapRazorPages();

app.MapHub<ChatHub>("/chatHub");

app.Run();
What Happened Here?
builder.Services.AddSignalR();Registers SignalR services.
app.MapHub<ChatHub>("/chatHub");Creates a SignalR endpoint accessible at:
https://localhost:5001/chatHubStep 5: Add SignalR JavaScript Client
Open your page and include the SignalR client library.
<script src="https://cdnjs.cloudflare.com/ajax/libs/microsoft-signalr/8.0.0/signalr.min.js"></script>Step 6: Create the Chat UI
Add the following HTML:
<div>
    <input id="userInput" placeholder="Name" />

    <input id="messageInput"
           placeholder="Message" />

    <button id="sendButton">
        Send
    </button>
</div>

<hr>

<ul id="messagesList"></ul>
This creates:
- User input
- Message input
- Send button
- Message display area
Step 7: Establish SignalR Connection
Add the JavaScript code below.
const connection = new signalR.HubConnectionBuilder()
    .withUrl("/chatHub")
    .build();
This creates a connection between the browser and the SignalR hub.
Step 8: Receive Messages from Server
Register a client-side method.
connection.on(
    "ReceiveMessage",
    function(user, message)
    {
        const li =
            document.createElement("li");

        li.textContent =
            `${user}: ${message}`;

        document
            .getElementById("messagesList")
            .appendChild(li);
    });
Whenever the server invokes:
Clients.All.SendAsync(
    "ReceiveMessage",
    user,
    message);
This JavaScript function executes.
Step 9: Start the Connection
connection.start()
    .then(function()
    {
        console.log(
            "Connected successfully");
    })
    .catch(function(err)
    {
        console.error(err);
    });
The client is now connected to the hub.
Step 10: Send Messages to Server
Attach a click event to the button.
document
.getElementById("sendButton")
.addEventListener("click",
function(event)
{
    const user =
        document.getElementById(
            "userInput").value;

    const message =
        document.getElementById(
            "messageInput").value;

    connection.invoke(
        "SendMessage",
        user,
        message)
        .catch(function(err)
        {
            console.error(err);
        });

    event.preventDefault();
});
How It Works
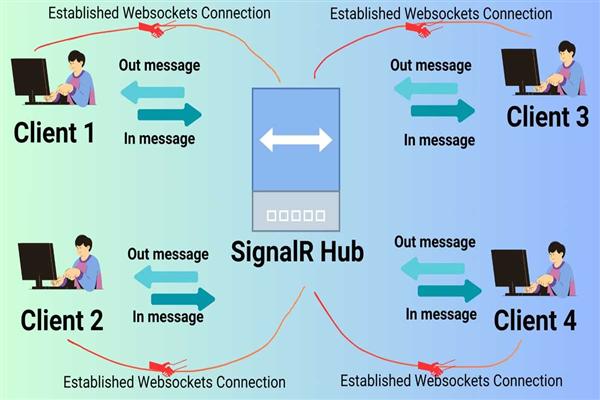
User enters a message.
- Client invokes
SendMessage(). - Hub receives the message.
- Hub broadcasts to all clients.
- All connected users receive the update instantly.
Step 11: Track User Connections
SignalR provides lifecycle methods.
public override async Task OnConnectedAsync()
{
    Console.WriteLine(
        $"Connected: {Context.ConnectionId}");

    await base.OnConnectedAsync();
}
Handle disconnections:
public override async Task OnDisconnectedAsync(
    Exception? exception)
{
    Console.WriteLine(
        $"Disconnected: {Context.ConnectionId}");

    await base.OnDisconnectedAsync(
        exception);
}
Use Cases
- User presence
- Online/offline tracking
- Audit logging
- Cleanup operations
Step 12: Send Messages to Specific Users
Broadcasting to everyone is not always ideal.
Send to a specific connection:
await Clients.Client(connectionId)
    .SendAsync(
        "ReceiveMessage",
        user,
        message);
Send to multiple users:
await Clients.Users(userIds)
    .SendAsync(
        "ReceiveMessage",
        user,
        message);
Step 13: Implement Chat Rooms Using Groups
Add a user to a group:
public async Task JoinRoom(
    string roomName)
{
    await Groups.AddToGroupAsync(
        Context.ConnectionId,
        roomName);
}
Send messages to a room:
await Clients.Group(roomName)
    .SendAsync(
        "ReceiveMessage",
        user,
        message);
Examples
- Team chats
- Department channels
- Project-based communication
- Private discussion rooms
Step 14: Enable Automatic Reconnection
Improve reliability by enabling reconnects.
const connection =
new signalR.HubConnectionBuilder()
    .withUrl("/chatHub")
    .withAutomaticReconnect()
    .build();
Benefits:
- Better user experience
- Reduced connection failures
- Automatic recovery after network interruptions
Step 15: Security Best Practices
Validate Input
if(string.IsNullOrWhiteSpace(message))
{
    return;
}
Use Authentication
[Authorize]
public class ChatHub : Hub
{
}- Sanitize User Content
- Prevent XSS attacks by encoding user-generated content before displaying it.
- Use HTTPS
- Always run SignalR over secure connections in production.
Complete Message Flow
Browser A
    |
    | invoke()
    v
SignalR Hub
    |
    | SendAsync()
    v
All Connected Clients
    |
    +--> Browser A
    +--> Browser B
    +--> Browser C
Performance Tips
For large-scale applications:
- Use Redis Backplane
- Enable Azure SignalR Service
- Avoid excessive broadcasts
- Use groups whenever possible
- Minimize payload size
- Cache frequently accessed data
Conclusion
SignalR makes it incredibly easy to build real-time chat applications in ASP.NET Core. By creating a Hub, establishing client connections, and broadcasting messages, you can implement a fully functional chat system with surprisingly little code.
