AI agents are becoming an important part of modern software development. Unlike a simple chatbot that only generates text, an AI agent can understand a request, decide what action is required, call a tool, process the result, and then provide an answer.
we will build a simple AI agent from scratch. The agent will:
- Understand a user request.
- Decide when a tool is required.
- Call a C# function.
- Receive the function result.
- Send the result back to the AI model.
- Generate a final response.
The example uses a calculator tool because it clearly demonstrates the core agent architecture. Once you understand this pattern, you can replace the calculator with database queries, REST APIs, search services, order systems, CRM systems, or other business tools.
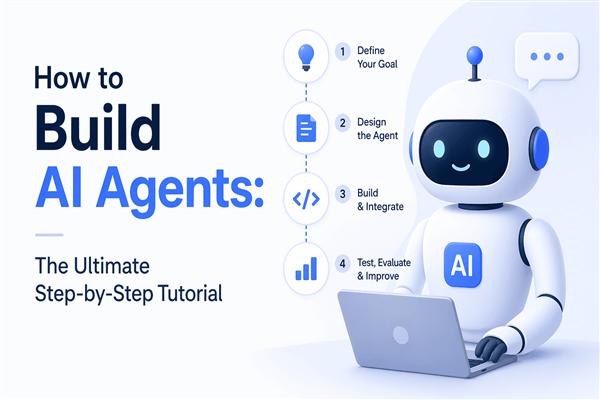
What Is an AI Agent?
A normal AI application often looks like this:
User
 ↓
Prompt
 ↓
AI Model
 ↓
Response
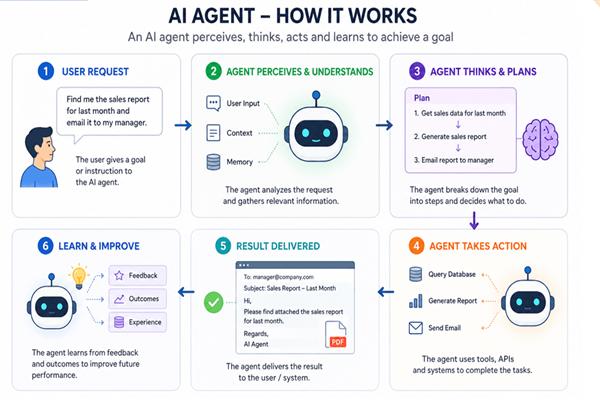
An AI agent adds an execution loop:
User
 ↓
AI Model
 ↓
Does the request require a tool?
 ├── No → Final response
 │
 └── Yes
      ↓
   C# Tool
      ↓
   Tool Result
      ↓
   AI Model
      ↓
Final response- The important idea is that the AI model does not directly execute your C# methods.
- Your application remains responsible for executing code.
- The model only decides which registered tool it wants to use and provides the arguments for that tool.
What We Will Build
Suppose the user asks:
What is 150 * 20?The AI model can decide that a calculation tool is needed and request something similar to:
calculate("150 * 20")Your C# application executes the method:
Calculate("150 * 20")The result is:
3000The result is sent back to the model, which can then answer:
The result is 3000.The complete flow becomes:
User
 ↓
AI Model
 ↓
Function Call
 ↓
C# Function
 ↓
3000
 ↓
AI Model
 ↓
Final Answer
Prerequisites
You need:
- .NET SDK
- Visual Studio or VS Code
- Basic C# knowledge
- An AI API key
We will use normal .NET APIs such as HttpClient and System.Text.Json so you can see what is really happening behind an agent framework.
Step 1: Create the .NET Project
Create a console application:
# Create a new .NET console project.
dotnet new console -n DotNetAiAgent

# Move into the project directory.
cd DotNetAiAgent

# Restore project dependencies.
dotnet restore
The initial project will contain:
DotNetAiAgent
│
├── DotNetAiAgent.csproj
└── Program.cs
Step 2: Configure the API Key
Never hard-code the API key directly into your source code.
For Windows PowerShell:
# Store the API key as a user-level environment variable.
[Environment]::SetEnvironmentVariable(
    "OPENAI_API_KEY",
    "YOUR_API_KEY",
    "User"
)
Read it from C#:
// Read the API key from the environment.
var apiKey = Environment.GetEnvironmentVariable("OPENAI_API_KEY");

// Stop the application when the key is not configured.
if (string.IsNullOrWhiteSpace(apiKey))
{
    // Display a useful configuration message.
    Console.WriteLine("OPENAI_API_KEY is not configured.");

    // Stop the program.
    return;
}
For production applications, use your organization's secret-management solution rather than storing secrets in source control.
Step 3: Create the AI Agent Class
Create a file named:
AiAgent.cs
Start with the basic agent structure:
using System.Net.Http.Headers;
using System.Text;
using System.Text.Json;

// Define the class responsible for AI-agent operations.
public class AiAgent
{
    // Store the HTTP client used for API calls.
    private readonly HttpClient _httpClient;

    // Store the API key used for authentication.
    private readonly string _apiKey;

    // Store the AI model name.
    private readonly string _model;

    // Create a new AI agent.
    public AiAgent(
        HttpClient httpClient,
        string apiKey,
        string model)
    {
        // Save the HTTP client.
        _httpClient = httpClient;

        // Save the API key.
        _apiKey = apiKey;

        // Save the model name.
        _model = model;

        // Add the Bearer token to outgoing API requests.
        _httpClient.DefaultRequestHeaders.Authorization =
            new AuthenticationHeaderValue("Bearer", _apiKey);
    }
}
The class will later contain:
- Tool definitions
- API requests
- Tool execution
- Response handling
- Agent-loop logic
Step 4: Define a C# Tool
An agent needs tools that it can request.
For our example, the tool will be called calculate.
// Return the calculator tool definition.
private static object GetCalculatorTool()
{
    // Create the schema that describes the available function.
    return new
    {
        // Tell the API that this is a custom function.
        type = "function",

        // Give the function a name.
        name = "calculate",

        // Explain when the function should be used.
        description = "Calculate a mathematical expression.",

        // Define the arguments accepted by the function.
        parameters = new
        {
            // The arguments must be a JSON object.
            type = "object",

            // Define the properties inside the object.
            properties = new
            {
                // Define the expression parameter.
                expression = new
                {
                    // The expression is represented as text.
                    type = "string",

                    // Tell the model what the value means.
                    description =
                        "A mathematical expression such as 10 + 20."
                }
            },

            // Require the expression property.
            required = new[] { "expression" },

            // Reject properties that were not defined.
            additionalProperties = false
        },

        // Request strict schema matching.
        strict = true
    };
}
The model can now understand that a tool named calculate exists and that it expects an
expression.
Conceptually, the model can request:
{
  "expression": "150 * 20"
}
The model still does not execute the function.
The C# application executes it.
Step 5: Implement the Calculator
For demonstration, create a simple calculator:
// Execute the calculation requested by the AI model.
private static string Calculate(string expression)
{
    // Remove unnecessary whitespace.
    expression = expression.Trim();

    // Handle addition expressions.
    if (expression.Contains('+'))
    {
        // Split the expression into separate values.
        var parts = expression.Split(
            '+',
            StringSplitOptions.RemoveEmptyEntries);

        // Convert the first value to a number.
        var left = double.Parse(parts[0].Trim());

        // Convert the second value to a number.
        var right = double.Parse(parts[1].Trim());

        // Return the addition result.
        return (left + right).ToString();
    }

    // Handle subtraction expressions.
    if (expression.Contains('-'))
    {
        // Split the expression into separate values.
        var parts = expression.Split(
            '-',
            StringSplitOptions.RemoveEmptyEntries);

        // Convert the first value to a number.
        var left = double.Parse(parts[0].Trim());

        // Convert the second value to a number.
        var right = double.Parse(parts[1].Trim());

        // Return the subtraction result.
        return (left - right).ToString();
    }

    // Handle multiplication expressions.
    if (expression.Contains('*'))
    {
        // Split the expression into separate values.
        var parts = expression.Split(
            '*',
            StringSplitOptions.RemoveEmptyEntries);

        // Convert the first value to a number.
        var left = double.Parse(parts[0].Trim());

        // Convert the second value to a number.
        var right = double.Parse(parts[1].Trim());

        // Return the multiplication result.
        return (left * right).ToString();
    }

    // Handle division expressions.
    if (expression.Contains('/'))
    {
        // Split the expression into separate values.
        var parts = expression.Split(
            '/',
            StringSplitOptions.RemoveEmptyEntries);

        // Convert the first value to a number.
        var left = double.Parse(parts[0].Trim());

        // Convert the second value to a number.
        var right = double.Parse(parts[1].Trim());

        // Prevent division by zero.
        if (right == 0)
        {
            // Return a readable error message.
            return "Cannot divide by zero.";
        }

        // Return the division result.
        return (left / right).ToString();
    }

    // Report expressions that are not supported.
    return "Unsupported mathematical expression.";
}
- This calculator is intentionally simple.
- A production application should use a proper expression parser and stronger validation.
- The important lesson is the interaction between the model and the C# method.
Step 6: Send the Request to the AI Model
Now create a method that sends the user's request and the available tools.
// Send a request to the AI model.
private async Task<JsonDocument> SendRequestAsync(
    object input,
    IEnumerable<object> tools)
{
    // Create the request payload.
    var requestBody = new
    {
        // Select the model.
        model = _model,

        // Define the main behavior of the agent.
        instructions =
            "You are a helpful AI agent. " +
            "Use the calculator tool when mathematical calculation is required.",

        // Provide the current user input.
        input = input,

        // Provide the tools available to the model.
        tools = tools
    };

    // Convert the request object to JSON.
    var json = JsonSerializer.Serialize(requestBody);

    // Create HTTP content containing the JSON.
    using var content = new StringContent(
        json,
        Encoding.UTF8,
        "application/json");

    // Send the HTTP POST request.
    using var response = await _httpClient.PostAsync(
        "https://api.openai.com/v1/responses",
        content);

    // Read the response body.
    var responseText =
        await response.Content.ReadAsStringAsync();

    // Throw an exception when the request fails.
    response.EnsureSuccessStatusCode();

    // Convert the response JSON into a document.
    return JsonDocument.Parse(responseText);
}
The important part here is that we send both:
User request
+
Available tools
The model can then decide whether a tool should be called.
Step 7: Detect a Function Call
The model response can contain different output types.
One of those output types can be a function call.
We need to inspect it.
// Process the model response.
private async Task<string> ProcessResponseAsync(
    JsonDocument response)
{
    // Read the output collection.
    var output =
        response.RootElement.GetProperty("output");

    // Examine every output item.
    foreach (var item in output.EnumerateArray())
    {
        // Read the output item's type.
        var type =
            item.GetProperty("type").GetString();

        // Continue only when the model requested a function.
        if (type != "function_call")
        {
            // Ignore other output types.
            continue;
        }

        // Read the requested function name.
        var functionName =
            item.GetProperty("name").GetString();

        // Read the function call ID.
        var callId =
            item.GetProperty("call_id").GetString();

        // Read the JSON arguments generated by the model.
        var argumentsJson =
            item.GetProperty("arguments").GetString();

        // Validate the received values.
        if (string.IsNullOrWhiteSpace(functionName) ||
            string.IsNullOrWhiteSpace(callId) ||
            string.IsNullOrWhiteSpace(argumentsJson))
        {
            // Return a safe error message.
            return "The model returned an invalid function call.";
        }

        // Check whether the calculator was requested.
        if (functionName == "calculate")
        {
            // Parse the function arguments.
            using var arguments =
                JsonDocument.Parse(argumentsJson);

            // Read the expression argument.
            var expression =
                arguments.RootElement
                    .GetProperty("expression")
                    .GetString();

            // Execute the C# calculator.
            var result =
                Calculate(expression ?? string.Empty);

            // Send the result back to the model.
            return await ContinueAfterToolCallAsync(
                response,
                callId,
                result);
        }
    }

    // Return normal model text when no tool was requested.
    return ExtractOutputText(response);
}
This is where the application becomes agentic.
The model is deciding what action to request, while your C# application controls the execution.
Step 8: Send the Tool Result Back
After the calculator executes, the result must be sent back to the model.
// Continue the AI conversation after executing a tool.
private async Task<string> ContinueAfterToolCallAsync(
    JsonDocument previousResponse,
    string callId,
    string toolResult)
{
    // Create the object containing the function result.
    var toolOutput = new[]
    {
        new
        {
            // Identify this item as function output.
            type = "function_call_output",

            // Connect the result with the original function call.
            call_id = callId,

            // Provide the result generated by the C# tool.
            output = toolResult
        }
    };

    // Build the continuation request.
    var requestBody = new
    {
        // Continue with the selected model.
        model = _model,

        // Continue from the previous response.
        previous_response_id =
            previousResponse.RootElement
                .GetProperty("id")
                .GetString(),

        // Send the tool result back to the model.
        input = toolOutput
    };

    // Convert the request to JSON.
    var json = JsonSerializer.Serialize(requestBody);

    // Create JSON HTTP content.
    using var content = new StringContent(
        json,
        Encoding.UTF8,
        "application/json");

    // Send the continuation request.
    using var response =
        await _httpClient.PostAsync(
            "https://api.openai.com/v1/responses",
            content);

    // Read the response text.
    var responseText =
        await response.Content.ReadAsStringAsync();

    // Throw an exception for a failed request.
    response.EnsureSuccessStatusCode();

    // Parse the next response.
    using var nextResponse =
        JsonDocument.Parse(responseText);

    // Extract the final text response.
    return ExtractOutputText(nextResponse);
}
The workflow is now:
AI → Function Call
C# → Function Execution
C# → Tool Result
AI → Final Response
Step 9: Extract the Final Text
Create a helper to read normal assistant text:
// Extract final text from an API response.
private static string ExtractOutputText(
    JsonDocument response)
{
    // Get the output array.
    var output =
        response.RootElement.GetProperty("output");

    // Examine all returned items.
    foreach (var item in output.EnumerateArray())
    {
        // Read the output type.
        var type =
            item.GetProperty("type").GetString();

        // Ignore items that are not messages.
        if (type != "message")
        {
            continue;
        }

        // Read the message content.
        var content =
            item.GetProperty("content");

        // Examine every content item.
        foreach (var contentItem in content.EnumerateArray())
        {
            // Read the content type.
            var contentType =
                contentItem.GetProperty("type").GetString();

            // Look for normal text output.
            if (contentType == "output_text")
            {
                // Return the generated text.
                return contentItem
                    .GetProperty("text")
                    .GetString()
                    ?? string.Empty;
            }
        }
    }

    // Return a fallback when no text is available.
    return "The agent did not return a text response.";
}
Step 10: Add the Main Agent Method
Now expose one public method that starts the entire process:
// Run the AI agent for the supplied user message.
public async Task<string> RunAsync(string userMessage)
{
    // Register the tools available to the model.
    var tools = new[]
    {
        // Add the calculator tool.
        GetCalculatorTool()
    };

    // Send the initial request.
    using var response =
        await SendRequestAsync(
            userMessage,
            tools);

    // Process the response.
    return await ProcessResponseAsync(response);
}
At this point, the agent can:
- Receive a user request.
- Send it to the model.
- Allow the model to select a function.
- Execute the C# function.
- Send the result back.
- Produce a final response.
Step 11: Create Program.cs
Now connect the agent to a simple console application.
// Read the API key from the environment.
var apiKey =
    Environment.GetEnvironmentVariable("OPENAI_API_KEY");

// Stop when the key is unavailable.
if (string.IsNullOrWhiteSpace(apiKey))
{
    // Tell the developer how to fix the configuration.
    Console.WriteLine(
        "Please configure OPENAI_API_KEY.");

    // Stop the application.
    return;
}

// Create a reusable HTTP client.
using var httpClient = new HttpClient();

// Set the model name.
// Replace this with a model available to your account.
var model = "YOUR_MODEL_NAME";

// Create the AI agent.
var agent = new AiAgent(
    httpClient,
    apiKey,
    model);

// Display the application title.
Console.WriteLine("=================================");
Console.WriteLine("       .NET AI Agent");
Console.WriteLine("=================================");

// Display input instructions.
Console.WriteLine(
    "Type a question or type 'exit' to stop.");

// Start the interactive conversation.
while (true)
{
    // Ask the user for a message.
    Console.Write("\nYou: ");

    // Read the user's message.
    var message = Console.ReadLine();

    // Stop when the user types exit.
    if (string.Equals(
        message,
        "exit",
        StringComparison.OrdinalIgnoreCase))
    {
        // Exit the loop.
        break;
    }

    // Ignore empty messages.
    if (string.IsNullOrWhiteSpace(message))
    {
        // Start the next loop iteration.
        continue;
    }

    try
    {
        // Run the AI agent.
        var result =
            await agent.RunAsync(message);

        // Display the agent's answer.
        Console.WriteLine($"\nAgent: {result}");
    }
    catch (Exception ex)
    {
        // Display an error message.
        Console.WriteLine(
            $"Error: {ex.Message}");
    }
}
Run the application:
# Build the application.
dotnet build

# Run the application.
dotnet run
Try:
What is 150 * 20?
The basic flow is:
User
 ↓
AI Model
 ↓
calculate("150 * 20")
 ↓
C# Calculate()
 ↓
3000
 ↓
AI Model
 ↓
The result is 3000.
Why This Is an AI Agent
A chatbot usually has this structure:
Question → Model → Answer
Our application has:
Question
   ↓
Model
   ↓
Tool selection
   ↓
C# execution
   ↓
Tool result
   ↓
Model
   ↓
Answer
The agent can therefore interact with the real application rather than only producing text.
For example, instead of:
What is order 10245?we can provide a tool:
get_order_status(orderId)Then the AI can request:
{
  "orderId": 10245
}
Your C# application can execute:
// Retrieve order information from your service.
var order =
    await orderService.GetOrderAsync(orderId);

// Return selected information to the model.
return JsonSerializer.Serialize(new
{
    // Return the order ID.
    orderId = order.Id,

    // Return the current order status.
    status = order.Status
});
The AI can then turn that result into a natural-language response.
Adding Multiple Tools
A real agent can have several tools.
For example:
// Register all functions available to the agent.
var tools = new object[]
{
    // Allow mathematical calculations.
    GetCalculatorTool(),

    // Allow order lookups.
    GetOrderTool(),

    // Allow customer lookups.
    GetCustomerTool(),

    // Allow product searches.
    GetProductSearchTool()
};
The model can choose among them.
For example:
"What is 30 * 40?"
        ↓
calculate
or:
"What is the status of order 1052?"
        ↓
get_order_status
or:
"Find product ASP.NET Core books."
        ↓
search_products
This is the foundation of tool-based AI agents.
Use Business Tools Instead of Generic Access
A critical design rule is to give an agent specific tools rather than unlimited access.
Avoid tools like:
// Avoid exposing arbitrary SQL execution.
ExecuteSql(string sql)
Prefer:
// Retrieve one order using a validated identifier.
GetOrder(int orderId)

// Retrieve a customer's profile.
GetCustomer(int customerId)

// Search products using a controlled query.
SearchProducts(string query)
This makes the application easier to secure, test, and monitor.
The AI should select from controlled capabilities rather than receive unrestricted access to your infrastructure.
Add Memory
A useful agent usually needs conversation history.
For example:
User:
My name is John.

User:
What is my name?
The second request needs information from the first message.
You can store conversation state in:
- SQL Server
- Redis
- PostgreSQL
- Distributed cache
- Another persistent store
A simple application-level representation could be:
// Store the previous response identifier for a conversation.
private string? _previousResponseId;
In larger systems, create a proper conversation store containing:
ConversationId
UserId
Messages
ToolCalls
ToolResults
CreatedAt
This lets you support persistent conversations across multiple requests.
Add a Tool-Call Limit
Never allow an agent to run tools indefinitely.
Without a limit, an application could accidentally produce:
Tool
 ↓
Model
 ↓
Tool
 ↓
Model
 ↓
Tool
 ↓
Model
Add a maximum iteration count:
// Limit how many agent tool cycles are allowed.
const int maxIterations = 5;

// Track the current iteration.
var iteration = 0;

// Continue until the maximum is reached.
while (iteration < maxIterations)
{
    // Increase the iteration count.
    iteration++;

    // Process the current model response.
    // Additional agent logic would execute here.
}

// Stop execution when the safety limit is exceeded.
throw new InvalidOperationException(
    "The agent exceeded the maximum tool-call limit.");
This protects both performance and cost.
Validate Tool Arguments
Never trust model-generated arguments blindly.
For example:
// Reject invalid customer identifiers.
if (customerId <= 0)
{
    // Prevent invalid input from reaching the business layer.
    throw new ArgumentException(
        "Customer ID must be greater than zero.");
}
The model is not your authorization system.
Your application must still check:
Authentication
      ↓
Authorization
      ↓
Validation
      ↓
Tool Execution
For example, if an agent can perform refunds, the model requesting:
refund_order(10245)does not mean the operation should automatically happen.
Your application should verify:
- Who is making the request?
- Is the user authorized?
- Is the order eligible?
- Does the refund comply with business rules?
Move the Agent to ASP.NET Core
The same agent can later be exposed through an ASP.NET Core API.
The architecture can become:
Web App
   ↓
ASP.NET Core API
   ↓
AI Agent
   ↓
AI Model
   ↓
C# Tools
   ↓
Business Services
   ↓
SQL / Redis / External APIs
A simple controller could look like:
// Define an API controller for the agent.
[ApiController]
[Route("api/agent")]
public class AgentController : ControllerBase
{
    // Store the AI agent service.
    private readonly AiAgent _agent;

    // Receive the agent using dependency injection.
    public AgentController(AiAgent agent)
    {
        // Save the injected service.
        _agent = agent;
    }

    // Create a POST endpoint for agent requests.
    [HttpPost("ask")]
    public async Task<IActionResult> Ask(
        [FromBody] string message)
    {
        // Execute the agent with the user's message.
        var result =
            await _agent.RunAsync(message);

        // Return the result as JSON.
        return Ok(new
        {
            // Return the generated answer.
            answer = result
        });
    }
}
Now your frontend, mobile application, or another service can call:
POST /api/agent/askRecommended .NET Project Structure
As the project grows, separate responsibilities:
DotNetAiAgent
│
├── Agents
│   ├── AiAgent.cs
│   └── AgentOptions.cs
│
├── Tools
│   ├── CalculatorTool.cs
│   ├── OrderTool.cs
│   ├── CustomerTool.cs
│   └── ProductTool.cs
│
├── Services
│   ├── OrderService.cs
│   ├── CustomerService.cs
│   └── ProductService.cs
│
├── Models
│   ├── AgentRequest.cs
│   └── AgentResponse.cs
│
├── Controllers
│   └── AgentController.cs
│
└── Program.cs
A clean architecture keeps the AI layer from becoming mixed with database and business logic.
Production Considerations
The calculator example is intentionally small. Real applications need more controls.
Logging
Track:
Agent request
Model response
Tool name
Tool-call count
Execution time
Errors
Do not log secrets or sensitive user information unnecessarily.
Timeouts
External tools should have sensible timeouts.
Retry Handling
Transient network failures can be handled with controlled retries.
Authentication
Know which user is making the request.
Authorization
Check whether that user is allowed to perform the requested action.
Rate Limiting
Protect agent endpoints from abuse.
Monitoring
Measure:
Latency
Error rate
Tool usage
Token usage
Success rate
Human Approval
Sensitive operations should support approval before execution.
For example:
AI proposes refund
       ↓
Approval required
       ↓
Human confirms
       ↓
C# executes refund
This is much safer for payments, account changes, deletions, and other high-impact operations.
AI Agent Architecture
A production .NET agent can eventually look like this:
                    ┌───────────────────┐
                    │ Web / Mobile App  │
                    └─────────┬─────────┘
                              │
                              ▼
                    ┌───────────────────┐
                    │ ASP.NET Core API  │
                    └─────────┬─────────┘
                              │
                              ▼
                    ┌───────────────────┐
                    │    AI Agent       │
                    │                   │
                    │ Prompt            │
                    │ Memory            │
                    │ Tool Selection    │
                    │ Tool Loop         │
                    └─────────┬─────────┘
                              │
                              ▼
                    ┌───────────────────┐
                    │    AI Model       │
                    └─────────┬─────────┘
                              │
                 ┌────────────┴────────────┐
                 ▼                         ▼
          ┌───────────────┐        ┌──────────────┐
          │ C# Tools      │        │ Memory       │
          └───────┬───────┘        └──────┬───────┘
                  │                       │
                  ▼                       ▼
          ┌───────────────┐        ┌──────────────┐
          │ Business      │        │ Redis / SQL  │
          │ Services      │        │              │
          └───────┬───────┘        └──────────────┘
                  │
                  ▼
          ┌───────────────┐
          │ Database /    │
          │ External API  │
          └───────────────┘
This architecture allows you to add AI capabilities to an existing .NET system without rewriting the whole application.
Common Mistakes
Giving the Agent Too Much Power
- Avoid unrestricted database, file-system, or operating-system access.
Trusting Model Output
- Always validate tool arguments and business rules.
No Tool-Call Limit
- A runaway tool loop can increase latency and cost.
Hard-Coded Secrets
- Keep API keys and credentials outside source control.
One Huge Agent Class
Separate:
Agent
Tools
Services
Models
Controllers
Letting the AI Handle Business Rules
- The AI should help determine the next action.
- The application should remain responsible for business rules and authorization.
From a Calculator to a Real Business Agent
Once the basic pattern is understood, you can replace the calculator with real .NET tools.
For example:
Calculator
       ↓
Database Service
       ↓
REST API
       ↓
CRM
       ↓
Order Management
       ↓
Search
       ↓
Knowledge Base
Imagine a customer-support agent:
User:
Why hasn't my order arrived?
The agent could:
1. Identify the order.
2. Call get_order_status().
3. Call get_shipping_details().
4. Read the results.
5. Explain the delay.
All of those operations can be implemented in C#.
The Most Important Concept
Do not think of an AI agent as:
AI that can do anything.
Think of it as:
A model that can choose from a controlled set of actions provided by your application.
- This distinction is extremely important.
- The AI model provides reasoning.
Your .NET application provides:
- Tools
- Data
- Business logic
- Security
- Permissions
- Execution
Your application remains in control.
Complete Agent Flow
The implementation we created follows this sequence:
1. User sends a request.
       ↓
2. .NET sends the request to the AI model.
       ↓
3. .NET tells the model which tools are available.
       ↓
4. The model decides whether a tool is needed.
       ↓
5. The model returns a function call.
       ↓
6. C# reads the function call.
       ↓
7. C# validates the arguments.
       ↓
8. C# executes the tool.
       ↓
9. C# sends the tool result to the model.
       ↓
10. The model generates the final response.
       ↓
11. .NET returns the answer to the user.
That is the fundamental architecture of a tool-based AI agent.
The most important concept is the tool-calling loop:
User
 ↓
AI Model
 ↓
Tool Selection
 ↓
C# Function
 ↓
Tool Result
 ↓
AI Model
 ↓
Final Response
Once you understand this loop, you can build much more advanced agents using the same foundation.
You can connect your agent to SQL Server, Redis, REST APIs, CRM systems, product databases, search services, internal APIs, or existing ASP.NET Core services.
For developers working with the broader .NET AI ecosystem, topics such as Machine Learning with .NET can provide additional context on how AI and machine-learning capabilities fit into the C# ecosystem.
The key principle is simple:
Let the AI decide what action may be useful, but let your .NET application decide whether that action is allowed and execute it safely.
