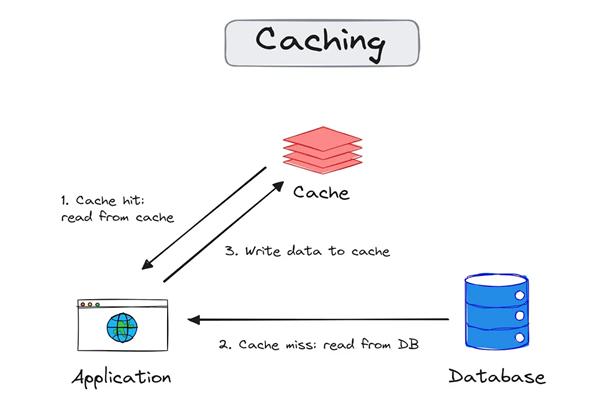
Caching is one of the most effective ways to improve application performance and scalability. When building high-performance APIs in ASP.NET Core, integrating Redis Cache can significantly reduce database load and response time.
What is Redis?
Redis (Remote Dictionary Server) is an open-source, in-memory data store used as a database, cache, and message broker. It stores data in RAM, making it extremely fast compared to traditional databases.
Why Use Redis Cache?
- Ultra-fast data access (in-memory)
- Reduces database load
- Improves API response time
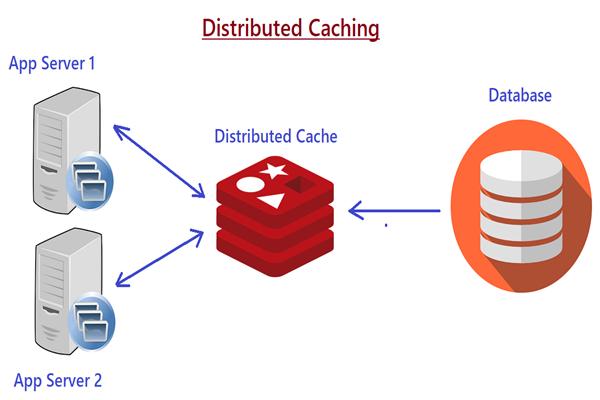
- Supports distributed caching
- Scalable and highly available
Prerequisites
Before we start, make sure you have:
- .NET 6 / .NET 7 / .NET 8 installed
- ASP.NET Core Web API project
- Redis installed locally or using Docker
Step 1: Install Redis
Option 1: Using Docker
docker run -d -p 6379:6379 redis
Option 2: Install locally
Download from official Redis site or use WSL for Windows.
Step 2: Install Required NuGet Package
Install Redis caching package:
dotnet add package Microsoft.Extensions.Caching.StackExchangeRedis
Step 3: Configure Redis in appsettings.json
"RedisCacheSettings": {
  "ConnectionString": "localhost:6379",
  "InstanceName": "MyApp_"
}
Step 4: Register Redis in Program.cs
builder.Services.AddStackExchangeRedisCache(options =>
{
    options.Configuration = builder.Configuration["RedisCacheSettings:ConnectionString"];
    options.InstanceName = builder.Configuration["RedisCacheSettings:InstanceName"];
});
Step 5: Create a Cache Service
To keep things clean and reusable, create a service:
public interface ICacheService
{
    Task<T> GetAsync<T>(string key);
    Task SetAsync<T>(string key, T value, TimeSpan? expiry = null);
    Task RemoveAsync(string key);
}
Implementation
using Microsoft.Extensions.Caching.Distributed;
using System.Text.Json;

public class CacheService : ICacheService
{
    private readonly IDistributedCache _cache;

    public CacheService(IDistributedCache cache)
    {
        _cache = cache;
    }

    public async Task<T> GetAsync<T>(string key)
    {
        var data = await _cache.GetStringAsync(key);
        if (data == null) return default;

        return JsonSerializer.Deserialize<T>(data);
    }

    public async Task SetAsync<T>(string key, T value, TimeSpan? expiry = null)
    {
        var options = new DistributedCacheEntryOptions
        {
            AbsoluteExpirationRelativeToNow = expiry ?? TimeSpan.FromMinutes(5)
        };

        var jsonData = JsonSerializer.Serialize(value);
        await _cache.SetStringAsync(key, jsonData, options);
    }

    public async Task RemoveAsync(string key)
    {
        await _cache.RemoveAsync(key);
    }
}
Step 6: Register Cache Service
builder.Services.AddScoped<ICacheService, CacheService>();
Step 7: Use Redis Cache in Controller
[ApiController]
[Route("api/[controller]")]
public class ProductsController : ControllerBase
{
    private readonly ICacheService _cacheService;

    public ProductsController(ICacheService cacheService)
    {
        _cacheService = cacheService;
    }

    [HttpGet]
    public async Task<IActionResult> GetProducts()
    {
        string cacheKey = "product_list";

        var cachedData = await _cacheService.GetAsync<List<string>>(cacheKey);

        if (cachedData != null)
        {
            return Ok(new
            {
                Source = "Cache",
                Data = cachedData
            });
        }

        // Simulate DB call
        var products = new List<string> { "Laptop", "Mobile", "Tablet" };

        await _cacheService.SetAsync(cacheKey, products, TimeSpan.FromMinutes(10));

        return Ok(new
        {
            Source = "Database",
            Data = products
        });
    }
}
Step 8: Test the API
- First request → Data comes from Database
- Second request → Data comes from Redis Cache
Cache Expiration Strategies
- Absolute Expiration → Fixed time (e.g., 10 minutes)
- Sliding Expiration → Reset expiry on access
- No Expiry → Persistent (use carefully)
Example:
options.SlidingExpiration = TimeSpan.FromMinutes(5);
Best Practices
- Use meaningful cache keys (
user_123_profile) - Avoid caching sensitive data
- Set appropriate expiration times
- Use compression for large data
- Monitor cache performance
When NOT to Use Redis
- Frequently changing data
- Small applications with low traffic
- When data consistency is critical without invalidation logic
Advanced Use Cases
- Distributed session storage
- API rate limiting
- Background job queues
- Real-time analytics
Conclusion
Integrating Redis with ASP.NET Core API is straightforward and highly beneficial for performance optimization. It helps reduce database calls, improves scalability, and enhances user experience.