Authentication is a critical part of any modern web application. Instead of building authentication from scratch, developers often rely on OAuth 2.0, a secure and industry-standard protocol for authorization.
In this blog, we’ll learn how to implement OAuth authentication in .NET Core using providers like Google, Microsoft, or Facebook.
What is OAuth?
OAuth (Open Authorization) is a protocol that allows users to authenticate using third-party services without sharing their passwords.
Example:
Instead of creating a new account, users can:
- “Login with Google”
- “Login with Facebook”
Why Use OAuth in .NET Core?
- No need to manage passwords
- Faster user onboarding
- Secure and widely trusted
- Reduces development effort
Prerequisites
Before starting, ensure you have:
- Installed .NET SDK
- Basic knowledge of ASP.NET Core
A project created using:
dotnet new mvcStep 1: Create ASP.NET Core Project
dotnet new mvc -n OAuthDemo
cd OAuthDemo
Step 2: Install Required Packages
dotnet add package Microsoft.AspNetCore.Authentication.Google
dotnet add package Microsoft.AspNetCore.Authentication.MicrosoftAccount
Step 3: Configure OAuth in appsettings.json
"Authentication": {
  "Google": {
    "ClientId": "YOUR_GOOGLE_CLIENT_ID",
    "ClientSecret": "YOUR_GOOGLE_CLIENT_SECRET"
  },
  "Microsoft": {
    "ClientId": "YOUR_MICROSOFT_CLIENT_ID",
    "ClientSecret": "YOUR_MICROSOFT_CLIENT_SECRET"
  }
}
Step 4: Configure Authentication in Program.cs
var builder = WebApplication.CreateBuilder(args);

builder.Services.AddAuthentication(options =>
{
    options.DefaultScheme = "Cookies";
    options.DefaultChallengeScheme = "Google";
})
.AddCookie()
.AddGoogle(options =>
{
    options.ClientId = builder.Configuration["Authentication:Google:ClientId"];
    options.ClientSecret = builder.Configuration["Authentication:Google:ClientSecret"];
})
.AddMicrosoftAccount(options =>
{
    options.ClientId = builder.Configuration["Authentication:Microsoft:ClientId"];
    options.ClientSecret = builder.Configuration["Authentication:Microsoft:ClientSecret"];
});

var app = builder.Build();

app.UseAuthentication();
app.UseAuthorization();
Step 5: Add Login Controller
using Microsoft.AspNetCore.Authentication;
using Microsoft.AspNetCore.Mvc;

public class AccountController : Controller
{
    public IActionResult Login(string provider)
    {
        var redirectUrl = Url.Action("Callback");
        var properties = new AuthenticationProperties
        {
            RedirectUri = redirectUrl
        };

        return Challenge(properties, provider);
    }

    public async Task<IActionResult> Callback()
    {
        var result = await HttpContext.AuthenticateAsync();

        if (!result.Succeeded)
            return RedirectToAction("Login");

        var claims = result.Principal.Claims;

        return View("Profile", claims);
    }

    public IActionResult Logout()
    {
        return SignOut("Cookies");
    }
}
Step 6: Add Login Buttons (View)
<a href="/Account/Login?provider=Google">Login with Google</a>
<a href="/Account/Login?provider=Microsoft">Login with Microsoft</a>
Step 7: Configure OAuth Providers
Google Setup
- Go to Google Cloud Console
- Create OAuth Client ID
Add redirect URI:
https://localhost:5001/signin-google
Microsoft Setup
- Go to Azure Portal
- Register your app
Add redirect URI:
https://localhost:5001/signin-microsoft
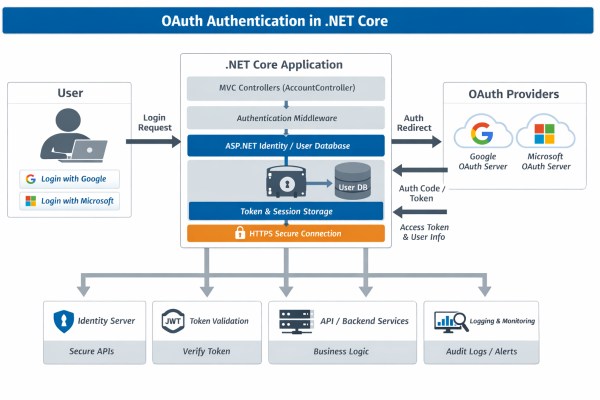
OAuth Flow (How It Works)
- User clicks login button
- Redirected to provider (Google/Microsoft)
- User authenticates
- Provider sends authorization code
- App exchanges code for access token
- User is logged in
Security Best Practices
- Always use HTTPS
- Store secrets securely (User Secrets / Key Vault)
- Validate tokens properly
- Use minimal scopes
- Enable CSRF protection
Common Issues & Fixes
| Issue | Fix |
|---|---|
| Redirect URI mismatch | Check exact URL |
| Invalid client ID | Verify credentials |
| Login fails silently | Enable logging |
| Claims missing | Check scopes |
Advanced Enhancements
- Add JWT token support
- Store user data in database
- Role-based authorization
- Multi-provider login system
- Refresh tokens implementation
Conclusion
Implementing OAuth in .NET Core makes authentication secure, scalable, and user-friendly. With minimal setup, you can enable social login and improve user experience significantly.