AI assistants such as Claude and GitHub Copilot can now call your own code, as long as your code speaks the Model Context Protocol (MCP). In this guide you will build an MCP server with ASP.NET Core, test it on your machine, package it in a container and put it on the internet behind a Cloudflare Worker.
Every step is explained, from the first command to the final connection from an AI app. By the end you will have a working server with four tools, a Dockerfile, a Worker that guards it, and a public HTTPS address you can add to any MCP client.
Tested on: .NET 8 with
ModelContextProtocol.AspNetCore2.4.0. The .NET server, its tools and everycurloutput shown below were run locally while writing this guide. The Cloudflare parts follow Cloudflare's official containers-template. Cloudflare Containers is a young product and its configuration can change, so if a setting here differs from the current docs, trust the docs and the template.
1. What is MCP, and why build a server?
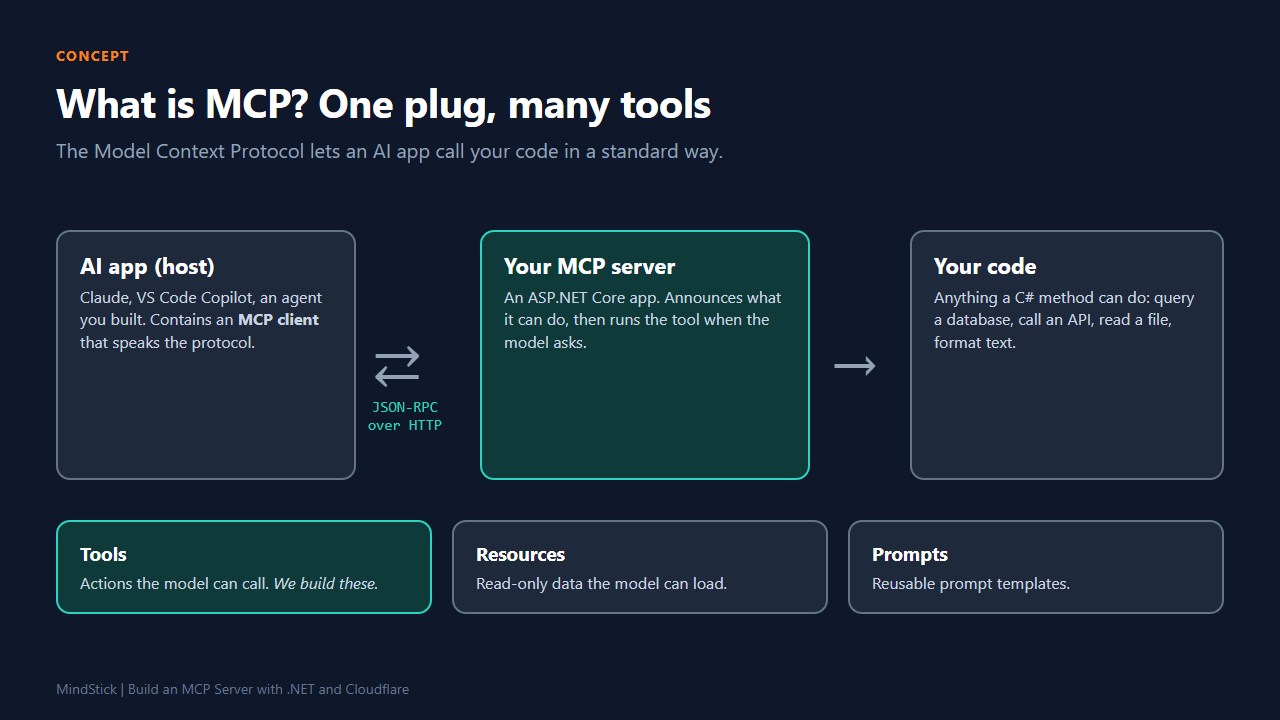
The Model Context Protocol is a standard way for an AI application to discover and use outside capabilities. Before MCP, every AI app needed its own custom plug-in for every service. With MCP you build the connection once and any compatible app can use it.
There are three roles:
- Host: the AI app the person uses, for example VS Code with Copilot or Claude.
- Client: a component inside the host that speaks the protocol. You do not write it.
- Server: your program. It tells the client what it can do and runs the action when asked. This is what we are building.
A server can offer three kinds of things: tools (actions the model can call), resources (read-only data) and prompts (reusable prompt templates). In this guide we build tools, because they are the most common and the easiest to see working.
Messages travel as JSON-RPC. A client sends something like tools/list to ask what is available, or
tools/call to run a tool. MCP servers come in two flavours. A local server runs on your own machine and talks over standard input and output. A
remote server is a web service reached over HTTP, using a transport called
Streamable HTTP. Remote is what lets a whole team share one server, so that is our target.
2. The plan: a Worker in front, .NET behind it
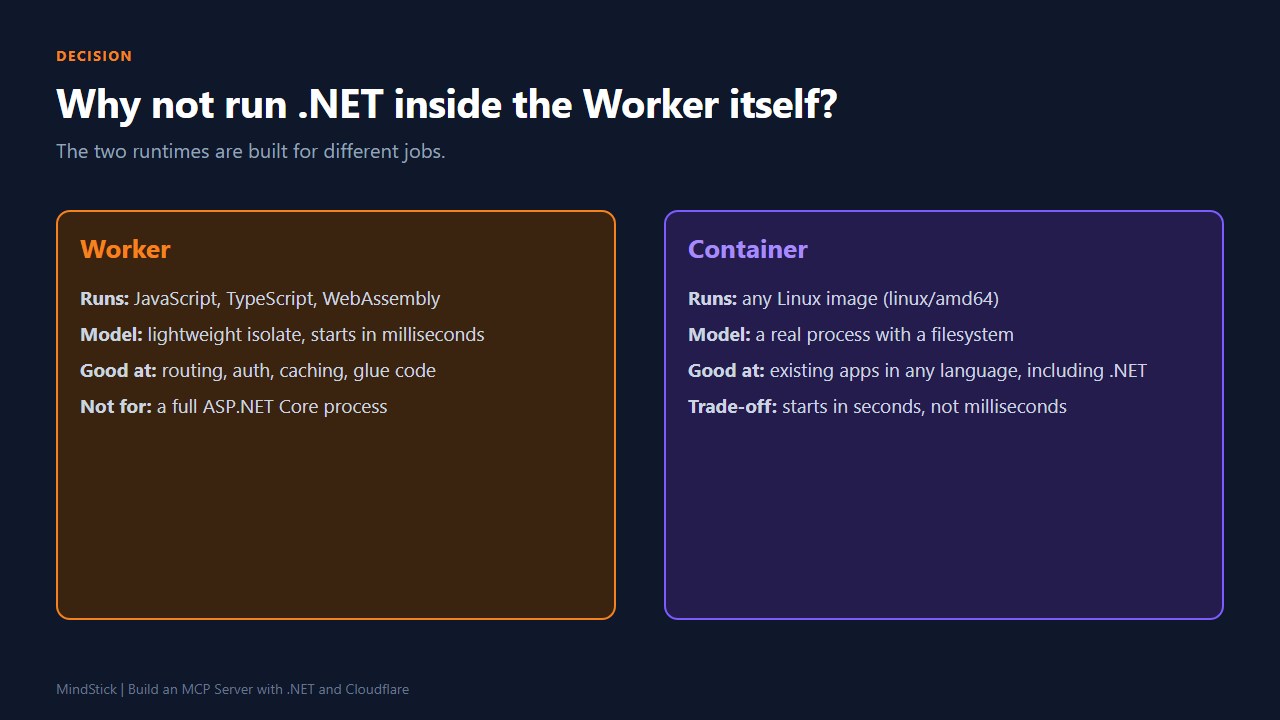
Here is the first thing worth knowing: a Cloudflare Worker cannot run an ASP.NET Core app directly. Workers run JavaScript, TypeScript and WebAssembly inside very light isolates. ASP.NET Core is a normal Linux process with its own runtime.
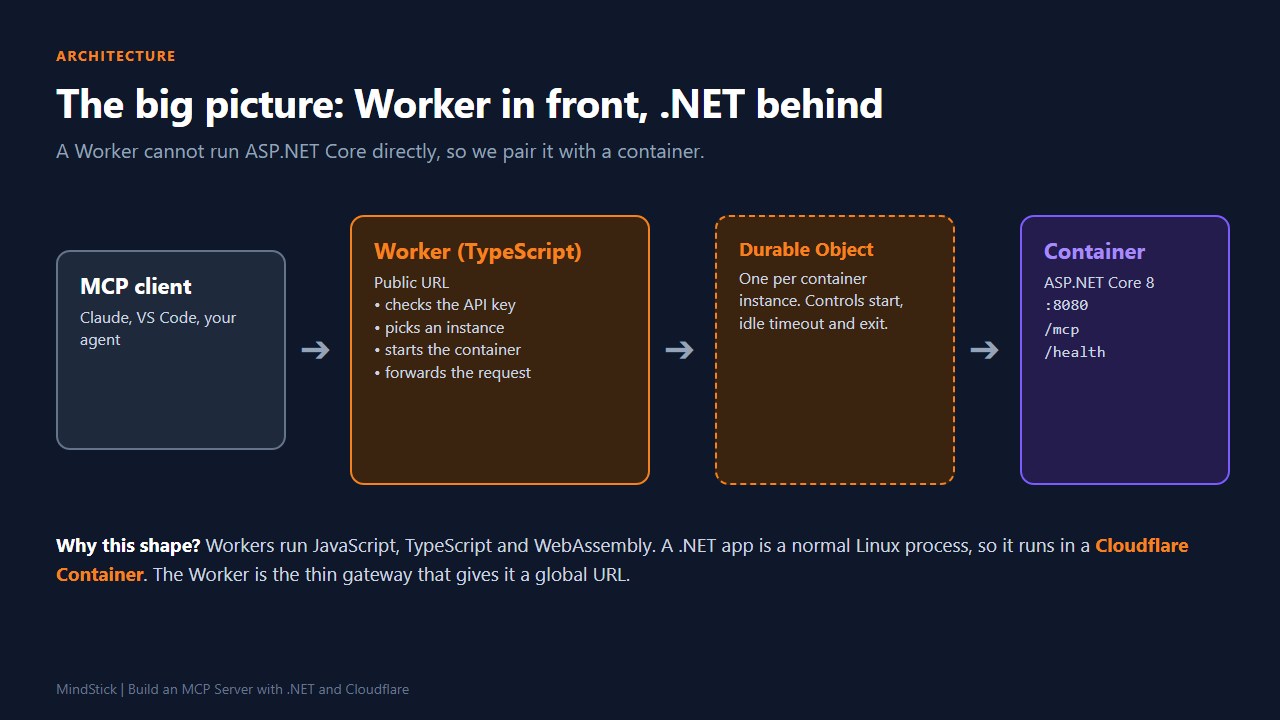
Cloudflare solves this with Cloudflare Containers: you give it a Docker image, and a Worker starts and talks to it on demand. So our design has four parts:
- The MCP client sends requests to one public HTTPS address.
- The Worker (a few lines of TypeScript) is the front door. It checks an API key, chooses a container instance and forwards the request.
- A Durable Object controls one container instance. It starts the container when needed, waits until it is healthy, and shuts it down after a period of inactivity.
- The container runs your ASP.NET Core MCP server on port 8080.
The big advantage of this design is that your C# code knows nothing about Cloudflare. It is an ordinary web app, so you can run, test and debug it on your machine exactly as you always do.
3. What you need before you start
- .NET 8 SDK (or newer) to build the server.
- Node.js and npm for the Worker side and for Wrangler, Cloudflare's command-line tool.
- Docker (Docker Desktop, or Colima on macOS). Wrangler uses it to build your image when you deploy, and it must be running. Cloudflare's docs require a recent Wrangler (4.136 or newer for this container setup).
- A Cloudflare account with access to Containers. Check that your plan includes it before you begin.
- An MCP-capable client to try the result, such as VS Code with GitHub Copilot in Agent mode.
Cloudflare Containers run linux/amd64 images. On an ARM machine, such as an Apple Silicon Mac, tell Docker to build for that platform (our Dockerfile already does).
4. Step 1: Create the projects
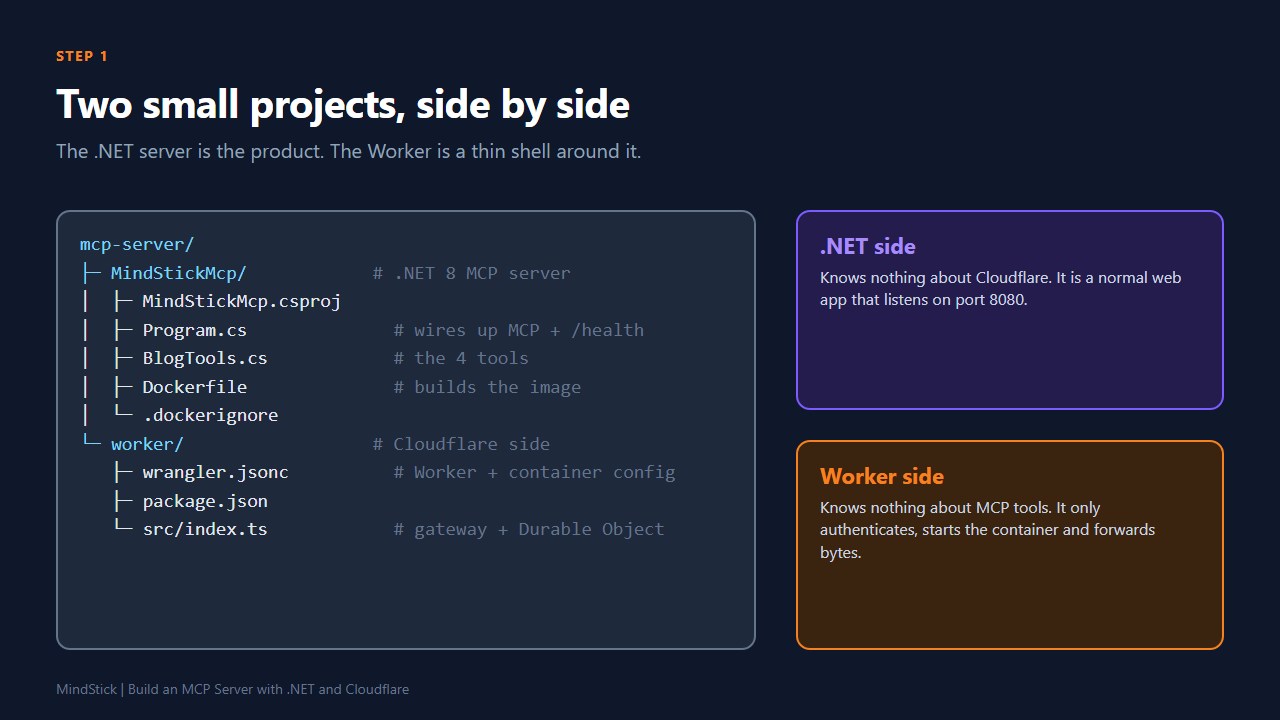
Make one folder with two sub-projects: the .NET server and the Worker. Start with the server, using the empty ASP.NET Core template, which gives you a web app with almost nothing in it:
mkdir mcp-server && cd mcp-server
dotnet new web -n MindStickMcp
cd MindStickMcp
dotnet new web creates Program.cs, a project file and settings files. We deliberately avoid the larger Web API template, because an MCP server does not need controllers or Swagger.
5. Step 2: Add the MCP package
dotnet add package ModelContextProtocol.AspNetCoreThe official C# SDK is split into three NuGet packages, and it helps to know which does what:
ModelContextProtocol.Corehas the low-level client and server APIs with minimal dependencies.ModelContextProtocoladds hosting, dependency injection and attribute-based tool discovery. It is the usual starting point.ModelContextProtocol.AspNetCoreadds the HTTP transport for ASP.NET Core and already references the one above. This is the one we need, because our server is reached over HTTP.
At the time of writing, the latest stable version on NuGet was 2.4.0. Older tutorials use
--prerelease because the SDK was still in preview, so a plain command now installs a stable release.
6. Step 3: Write Program.cs
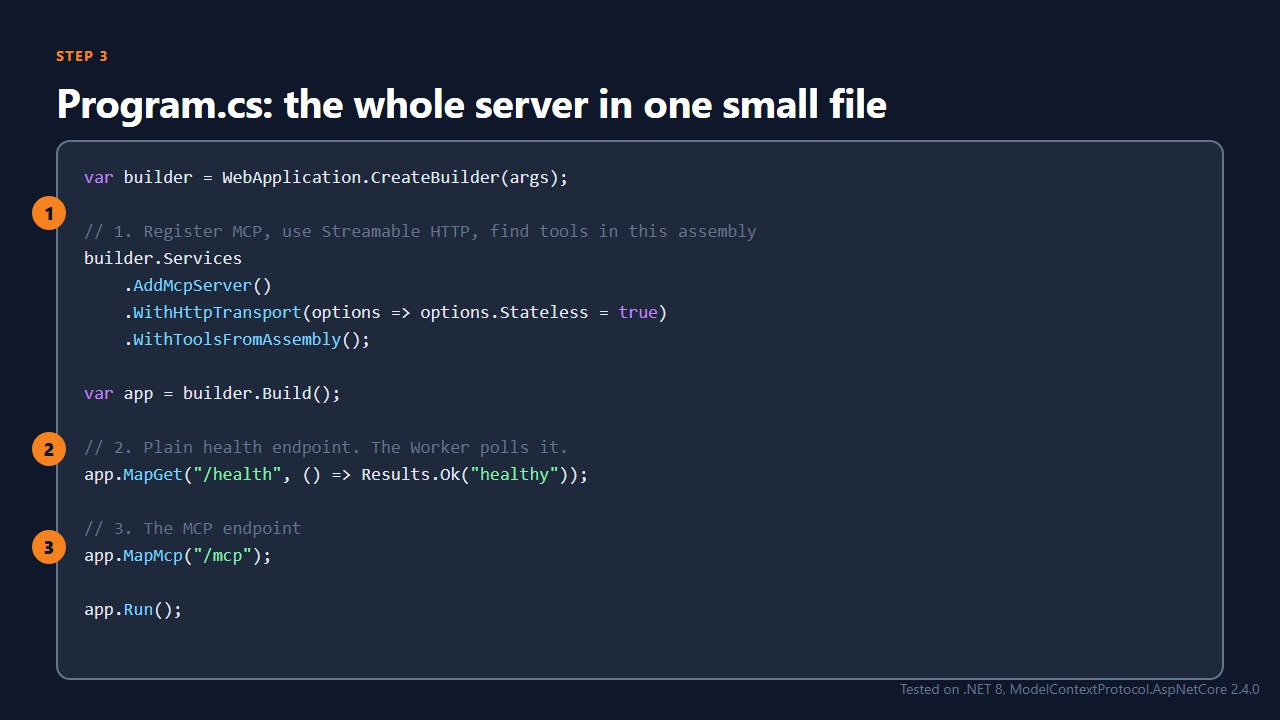
Replace the contents of Program.cs with this. It is the whole server setup:
using ModelContextProtocol.Server;

var builder = WebApplication.CreateBuilder(args);

// 1. Register the MCP server, use the Streamable HTTP transport, and
//    discover every [McpServerToolType] class in this assembly.
builder.Services
    .AddMcpServer()
    .WithHttpTransport(options => options.Stateless = true)
    .WithToolsFromAssembly();

var app = builder.Build();

// 2. A plain health endpoint. The Cloudflare Worker polls this to know
//    when the container is ready. MCP responses are not suitable for this.
app.MapGet("/health", () => Results.Ok("healthy"));

// 3. Expose the MCP endpoint at /mcp.
app.MapMcp("/mcp");

app.Run();
Let us go through it piece by piece.
1. Registering MCP. AddMcpServer() adds the MCP server to ASP.NET Core's service container.
WithHttpTransport(...) chooses the Streamable HTTP transport, the one remote clients use.
WithToolsFromAssembly() scans your project for classes marked as tool providers, so you never register tools by hand.
Why Stateless = true? By default an MCP HTTP server keeps a session for each client, which means a follow-up request must reach the same server instance. That fails in our setup, because the Worker spreads requests over several containers and any container can go to sleep. Stateless mode treats every request on its own, so any instance can answer any request. The trade-off is that the server cannot start requests to the client, for features such as sampling or elicitation. Our tools do not need them.
2. The health endpoint. /health is a plain endpoint that returns
"healthy". The Worker will call it to learn when the container is ready. We do not use
/mcp for this, because its replies are JSON-RPC messages and are not suited to health checks.
3. Exposing MCP. MapMcp("/mcp") mounts the MCP endpoint at
/mcp. Without an argument it would sit at the root. A dedicated path keeps room for other routes later.
7. Step 4: Write your tools
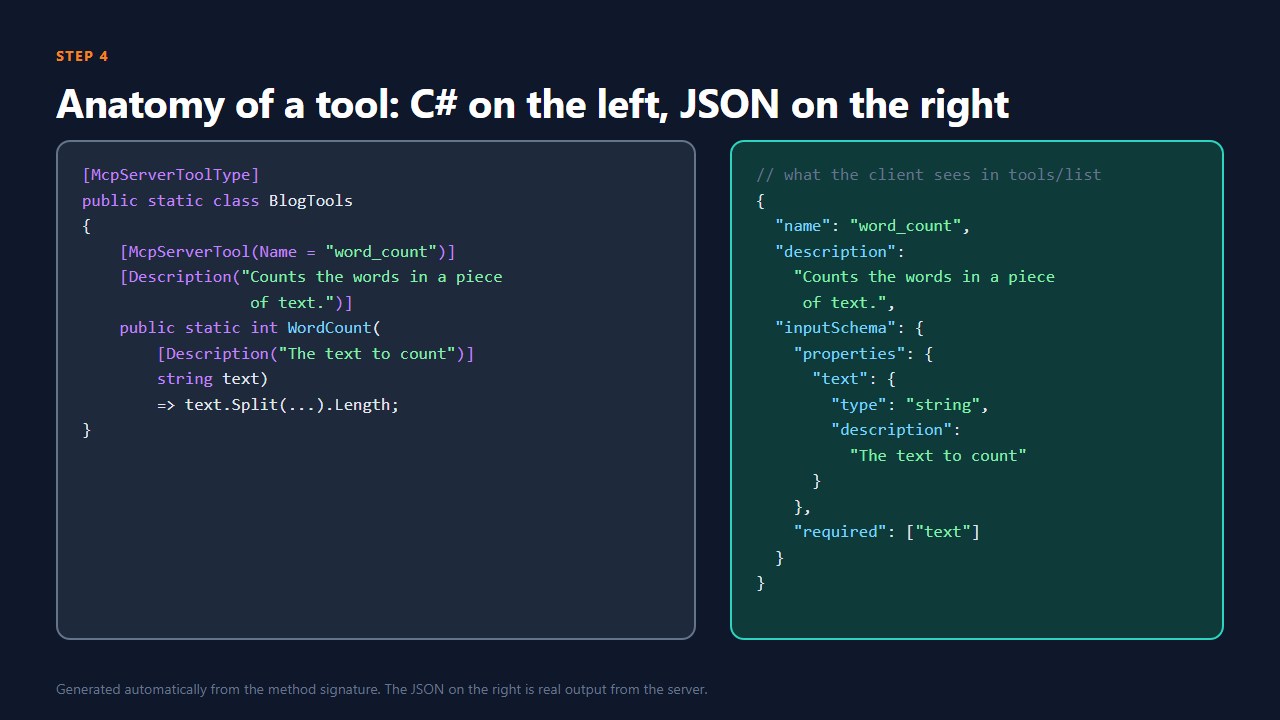
Add a file named BlogTools.cs. Our toolbox helps with blog writing: it makes slugs, counts words, estimates reading time and tells the time.
using System.ComponentModel;
using System.Globalization;
using System.Text;
using System.Text.RegularExpressions;
using ModelContextProtocol;
using ModelContextProtocol.Server;

namespace MindStickMcp;

[McpServerToolType]
public static class BlogTools
{
    [McpServerTool(Name = "slugify"), Description("Turns a blog title into a URL-friendly slug, for example 'Hello World!' becomes 'hello-world'.")]
    public static string Slugify(
        [Description("The title to convert")] string title)
    {
        var normalized = title.Normalize(NormalizationForm.FormD);
        var sb = new StringBuilder();
        foreach (var c in normalized)
        {
            if (CharUnicodeInfo.GetUnicodeCategory(c) != UnicodeCategory.NonSpacingMark)
                sb.Append(c);
        }
        var slug = Regex.Replace(sb.ToString().ToLowerInvariant(), "[^a-z0-9]+", "-").Trim('-');
        return slug;
    }

    [McpServerTool(Name = "word_count"), Description("Counts the words in a piece of text.")]
    public static int WordCount(
        [Description("The text to count")] string text)
        => text.Split((char[]?)null, StringSplitOptions.RemoveEmptyEntries).Length;

    [McpServerTool(Name = "reading_time"), Description("Estimates reading time in minutes for a text, at 200 words per minute by default.")]
    public static string ReadingTime(
        [Description("The text to measure")] string text,
        [Description("Reading speed in words per minute (default 200)")] int wordsPerMinute = 200)
    {
        if (wordsPerMinute <= 0) throw new McpException("wordsPerMinute must be greater than zero.");
        var words = WordCount(text);
        var minutes = Math.Max(1, (int)Math.Ceiling(words / (double)wordsPerMinute));
        return $"{words} words, about {minutes} min read";
    }

    [McpServerTool(Name = "utc_time"), Description("Returns the current UTC date and time in ISO 8601 format.")]
    public static string UtcTime() => DateTime.UtcNow.ToString("O");
}
What each part does:
[McpServerToolType]marks the class as a holder of tools.WithToolsFromAssembly()only looks at classes with this attribute. The class isstatichere because our tools need no injected services. For tools that do (a database, say), use a normal class and add a constructor, and ASP.NET Core will inject them.[McpServerTool(Name = "slugify")]turns a method into a tool. WithoutName, the name comes from the method. We set snake_case names, a common style for tools.[Description(...)]is the most important line for quality. The AI model never sees your code. It reads only the name, the description and the parameters to decide whether and how to call your tool, so write them as clearly as you would for a new colleague.- Parameters become the tool's input schema. A
string titlebecomes a required text field. The parameterint wordsPerMinute = 200has a default, so the schema marks it optional and shows the default. You do not write any JSON schema yourself. - Return values are converted to the reply automatically. Return a string, a number or an object and the SDK wraps it.
McpExceptionis how you report a clean error. Its message reaches the model, which can then fix its input and try again. Other exceptions are hidden behind a generic message so that internals do not leak.
The Slugify method first splits accented letters into a base letter plus a mark (NormalizationForm.FormD), drops the marks, lower-cases the text, and then replaces every run of characters that are not a-z or 0-9 with a single hyphen. So a title like "Café Menu!" becomes cafe-menu.
8. Step 5: Test it locally first
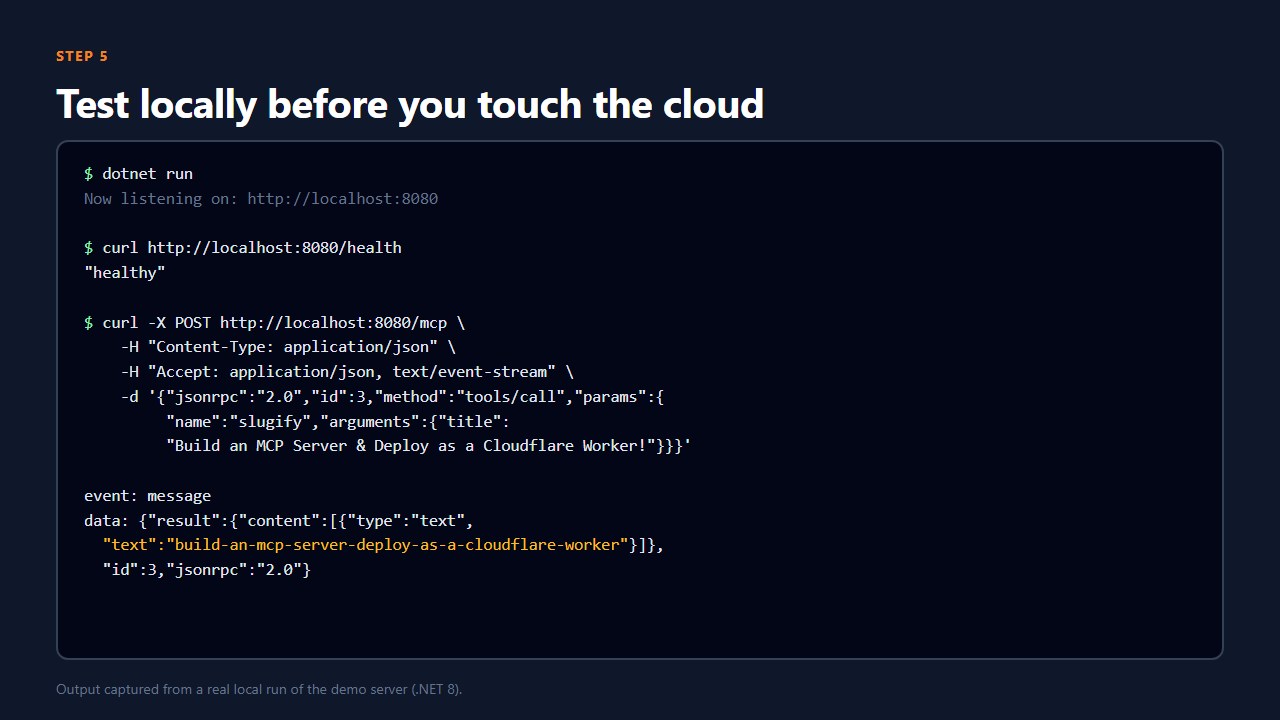
Always test on your own machine before the cloud. Debugging a container inside a remote platform is much slower. Start the server on port 8080, the same port the container will use later:
ASPNETCORE_URLS=http://localhost:8080 dotnet runOn Windows PowerShell, set the variable first with $env:ASPNETCORE_URLS="http://localhost:8080". Then check the health endpoint:
curl http://localhost:8080/health
"healthy"
Now speak MCP. First ask which tools exist. Two headers matter: Content-Type: application/json because you send JSON, and
Accept: application/json, text/event-stream because the Streamable HTTP transport lets the server answer in either format.
curl -X POST http://localhost:8080/mcp \
  -H "Content-Type: application/json" \
  -H "Accept: application/json, text/event-stream" \
  -d '{"jsonrpc":"2.0","id":2,"method":"tools/list"}'
The reply lists all four tools, each with the description and input schema generated from your C# code. Now call one:
curl -X POST http://localhost:8080/mcp \
  -H "Content-Type: application/json" \
  -H "Accept: application/json, text/event-stream" \
  -d '{"jsonrpc":"2.0","id":3,"method":"tools/call","params":{"name":"slugify","arguments":{"title":"Build an MCP Server & Deploy as a Cloudflare Worker!"}}}'
In our run the server answered with this (the reply is framed as a server-sent event, which is normal for this transport):
event: message
data: {"result":{"content":[{"type":"text","text":"build-an-mcp-server-deploy-as-a-cloudflare-worker"}]},"id":3,"jsonrpc":"2.0"}
Try the error path too. Calling reading_time with "wordsPerMinute":0 returned a result flagged
"isError":true with the text "An error occurred invoking 'reading_time': wordsPerMinute must be greater than zero." That is exactly what the model needs to correct itself.
Two more things you may notice. A plain GET to /mcp returns
405 Method Not Allowed with an Allow: POST header, which is expected in stateless mode. And if you prefer a visual tool, the MCP Inspector (npx @modelcontextprotocol/inspector@latest) can connect to
http://localhost:8080/mcp, list the tools and call them from a web page.
9. Step 6: Package it in a Docker image
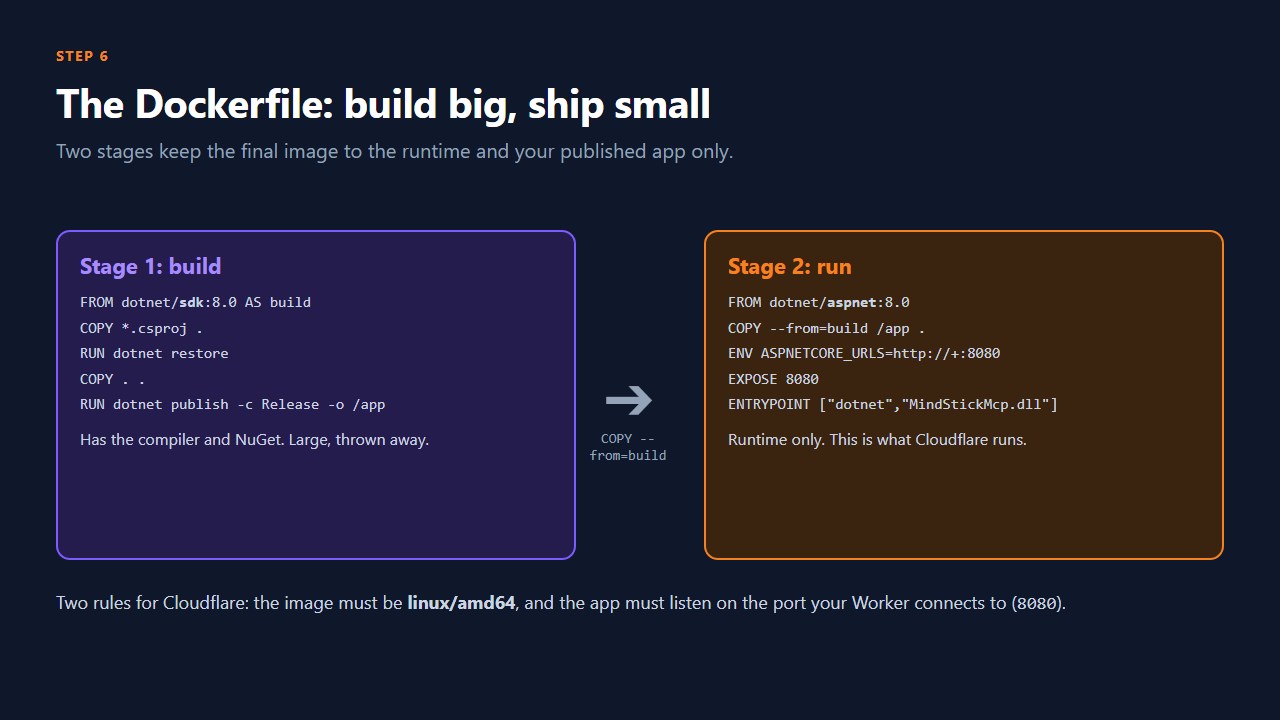
Add a Dockerfile next to the project file. It uses a multi-stage build, which means one image compiles the code and a second, much smaller image runs it:
# Stage 1: build
FROM --platform=linux/amd64 mcr.microsoft.com/dotnet/sdk:8.0 AS build
WORKDIR /src
COPY *.csproj .
RUN dotnet restore
COPY . .
RUN dotnet publish -c Release -o /app --no-restore

# Stage 2: run (small ASP.NET Core runtime image)
FROM --platform=linux/amd64 mcr.microsoft.com/dotnet/aspnet:8.0
WORKDIR /app
COPY --from=build /app .
ENV ASPNETCORE_URLS=http://+:8080
EXPOSE 8080
ENTRYPOINT ["dotnet", "MindStickMcp.dll"]
FROM --platform=linux/amd64 ...sdk:8.0 AS buildstarts from the full .NET SDK image, which has the compiler and NuGet. The platform flag forces the architecture Cloudflare Containers needs.COPY *.csproj .followed byRUN dotnet restorecopies only the project file first and downloads packages. Docker caches this layer, so rebuilding after a code change does not download everything again.COPY . .thendotnet publish -c Release -o /appcopies your source and produces the optimised output in/app.- The second
FROM ...aspnet:8.0starts a fresh, small image with only the ASP.NET Core runtime.COPY --from=build /app .brings in just the published app. The SDK and your source code never reach the final image. ENV ASPNETCORE_URLS=http://+:8080makes Kestrel listen on port 8080 on all interfaces. This must match the port in the Worker.ENTRYPOINTstarts the app. The name must match your project's DLL.
Also add a .dockerignore with bin/ and obj/ so local build output is not copied into the image. If Docker is installed, try it before deploying:
docker build -t mindstick-mcp .
docker run -p 8080:8080 mindstick-mcp
curl http://localhost:8080/health
On the machine used for this guide, the running server used about 60 MB of memory after a few calls. That is a Windows measurement, so treat it as a rough guide, but it shows a .NET MCP server is light.
10. Step 7: Create the Worker
Now the Cloudflare side. Create a worker folder next to the .NET project and add a few files. First,
package.json with the tools you need:
{
  "name": "mindstick-mcp-worker",
  "private": true,
  "scripts": {
    "dev": "wrangler dev",
    "deploy": "wrangler deploy",
    "types": "wrangler types"
  },
  "dependencies": {
    "hono": "^4.0.0"
  },
  "devDependencies": {
    "wrangler": "^4.141.0",
    "typescript": "^5.5.0"
  }
}
Run npm install and then npx wrangler types, which generates the TypeScript definitions for your bindings.
The configuration: wrangler.jsonc
{
  "$schema": "node_modules/wrangler/config-schema.json",
  "name": "mindstick-mcp",
  "main": "src/index.ts",
  "compatibility_date": "2025-10-08",
  "compatibility_flags": ["nodejs_compat"],
  "observability": { "enabled": true },
  "containers": [
    {
      "class_name": "McpContainer",
      "scheduling_policy": "durable_object",
      "images": {
        "base": {
          // Path to the Dockerfile of the .NET MCP server
          "dockerfile": "../MindStickMcp/Dockerfile"
        }
      }
    }
  ],
  "durable_objects": {
    "bindings": [{ "class_name": "McpContainer", "name": "MCP_CONTAINER" }]
  },
  "exports": {
    "McpContainer": { "type": "durable-object", "storage": "sqlite" }
  }
}mainis the Worker's entry file andcompatibility_datepins the runtime behaviour to a known date so updates do not surprise you.observabilityturns on logs, which you will want when something goes wrong.- In
containers,class_namelinks this container to the Durable Object class that controls it.scheduling_policy: "durable_object"means that object decides when the container starts and stops.images.base.dockerfilepoints at the Dockerfile Wrangler should build. durable_objects.bindingsgives the Worker a handle namedMCP_CONTAINERfor reaching that class.exportsdeclaresMcpContaineras a Durable Object with SQLite storage. Do not combineexportswith the oldermigrationssetting.
The code: src/index.ts
The file has two jobs: define the Durable Object that runs the container, and define the Worker that receives requests. Here is the Durable Object first.
import { DurableObject } from "cloudflare:workers";
import { Hono } from "hono";

const PORT = 8080; // the port ASP.NET Core listens on (ASPNETCORE_URLS)
const INACTIVITY_TIMEOUT_MS = 2 * 60 * 1000; // stop the container after 2 idle minutes
const POOL_SIZE = 3; // the MCP server is stateless, so any instance can answer

// One Durable Object = one running .NET container.
export class McpContainer extends DurableObject<Env> {
  private starting: Promise<void> | undefined;
  private monitoring: Promise<void> | undefined;

  constructor(ctx: DurableObjectState, env: Env) {
    super(ctx, env);
    const container = ctx.container;
    if (container?.running) {
      void ctx.blockConcurrencyWhile(() =>
        container.setInactivityTimeout(INACTIVITY_TIMEOUT_MS),
      );
      this.observeExit();
    }
  }

  async fetch(request: Request): Promise<Response> {
    // Start the container once, even if many requests arrive together.
    this.starting ??= this.startAndWaitForPort().finally(() => {
      this.starting = undefined;
    });
    await this.starting;

    // Forward the request to the ASP.NET Core process inside the container.
    const url = new URL(request.url);
    url.protocol = "http:";
    url.host = "container";
    const forwarded = new Request(url, request);
    forwarded.headers.delete("host");
    return this.ctx.container!.getTcpPort(PORT).fetch(forwarded);
  }

  private async startAndWaitForPort(): Promise<void> {
    const container = this.ctx.container!;
    if (!container.running) {
      container.start({
        image: container.images.base,
        instance: "basic", // 1 GiB RAM: comfortable headroom for .NET
        enableInternet: false, // our tools need no outbound network
      });
    }
    this.observeExit();
    await container.setInactivityTimeout(INACTIVITY_TIMEOUT_MS);

    // "running" only means startup was requested. Wait until /health answers.
    const port = container.getTcpPort(PORT);
    for (let attempt = 0; attempt < 100; attempt++) {
      try {
        const response = await port.fetch("http://container/health", {
          signal: AbortSignal.timeout(1000),
        });
        await response.body?.cancel();
        if (response.ok) return;
      } catch {
        // not listening yet, try again
      }
      await scheduler.wait(200);
    }
    throw new Error("Container did not become ready on port 8080");
  }

  private observeExit(): void {
    if (this.monitoring) return;
    this.monitoring = this.ctx
      .container!.monitor()
      .then(() => console.log("Container exited successfully"))
      .catch((error: unknown) => console.error("Container failed:", error))
      .finally(() => {
        this.monitoring = undefined;
      });
    this.ctx.waitUntil(this.monitoring);
  }
}

const app = new Hono<{ Bindings: Env & { MCP_API_KEY?: string } }>();

// Gate: require "Authorization: Bearer <MCP_API_KEY>" before any request
// reaches the container. If no key is configured, every request is refused
// (fail closed). Set the key with: npx wrangler secret put MCP_API_KEY
app.use("/mcp", async (c, next) => {
  const expected = c.env.MCP_API_KEY;
  if (!expected || c.req.header("authorization") !== `Bearer ${expected}`) {
    return c.text("Unauthorized", 401);
  }
  await next();
});

// MCP clients use POST (and sometimes GET/DELETE), so accept every method.
app.all("/mcp", (c) => {
  const index = Math.floor(Math.random() * POOL_SIZE);
  return c.env.MCP_CONTAINER.getByName(`pool-${index}`).fetch(c.req.raw);
});

app.get("/health", (c) => c.text("worker ok"));

app.onError((error, c) => {
  console.error("MCP request failed:", error);
  return c.text("MCP request failed. Check the Worker logs and retry.", 502);
});

export default app;
How it works, step by step:
- Constants.
PORTis 8080 to match the Dockerfile.INACTIVITY_TIMEOUT_MSstops the container after two idle minutes so you are not running it for nothing.POOL_SIZEis how many instances we spread requests across. - The constructor. If the Durable Object restarts while its container is still running, this restores the idle timer and the exit watcher so nothing is forgotten.
fetch(). It starts the container, but only once even if many requests arrive together (thestartingpromise is shared). Then it rewrites the address tohttp://container, removes the originalhostheader, and sends the request to port 8080 inside the container.startAndWaitForPort(). It callscontainer.start()with the image from your config, thebasicinstance size (1 GiB of memory, comfortable for .NET) andenableInternet: false, because our tools make no outside calls. Then it polls/healthup to 100 times, 200 ms apart. "Running" only means the start was requested, not that Kestrel is listening, so this wait is essential.observeExit(). It watches the container and logs when it exits or crashes.- The auth gate. Before any request reaches a container, the Worker compares the
Authorizationheader withBearer <MCP_API_KEY>. If the key is missing or wrong, it answers 401. If you forget to set the secret, the Worker refuses everything instead of allowing everyone, which is the safe default. - The route.
app.all("/mcp", ...)accepts every HTTP method, since MCP clients use POST and sometimes GET or DELETE. It picks one of three named instances at random (pool-0topool-2). Because the server is stateless, any of them can answer. - Error handling. Anything that goes wrong becomes a clear 502 and is logged.
Because the container code does not hot-reload, remember that code changes in .NET need a rebuild. Locally, run
npx wrangler dev with Docker running and press r to rebuild the container. For local testing, create a file named
.dev.vars containing MCP_API_KEY=dev-only-key-change-me, and keep it out of source control. If you see "Container is not listening to port 8080", the app was still starting. Wait a moment and retry.
11. Step 8: Deploy
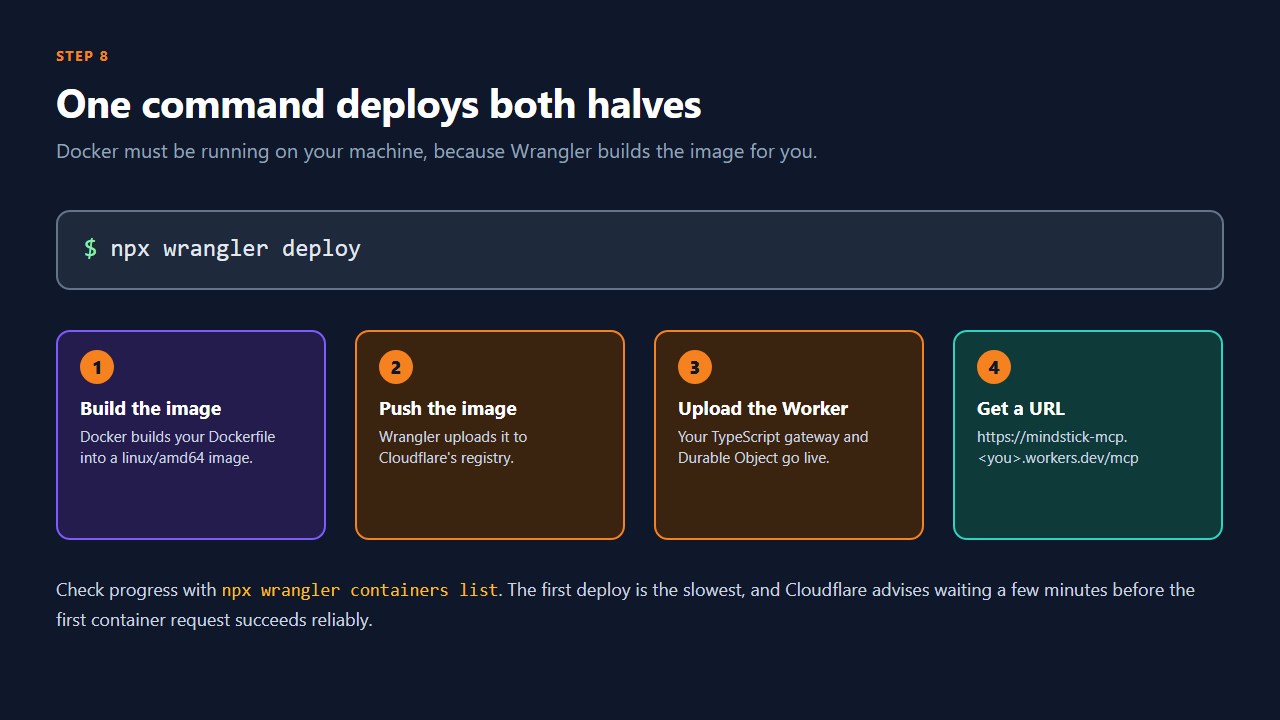
Log in once with npx wrangler login, make sure Docker is running, and then run one command from the
worker folder:
npx wrangler deployIt does four things for you. It builds your Docker image, pushes it to Cloudflare's registry, uploads the Worker and the Durable Object, and creates the public address, which looks like
https://mindstick-mcp.<your-subdomain>.workers.dev.
The first deploy is the slowest, and Cloudflare advises waiting several minutes before container requests succeed reliably. Check progress with:
npx wrangler containers list
npx wrangler containers images list
Now set the secret that the gate checks. Pick a long random value and keep a copy:
npx wrangler secret put MCP_API_KEYWrangler asks you to paste the value, and it is stored encrypted. Until you do this, the Worker answers 401 to everything, which is the safe behaviour.
12. Step 9: Test the deployed server
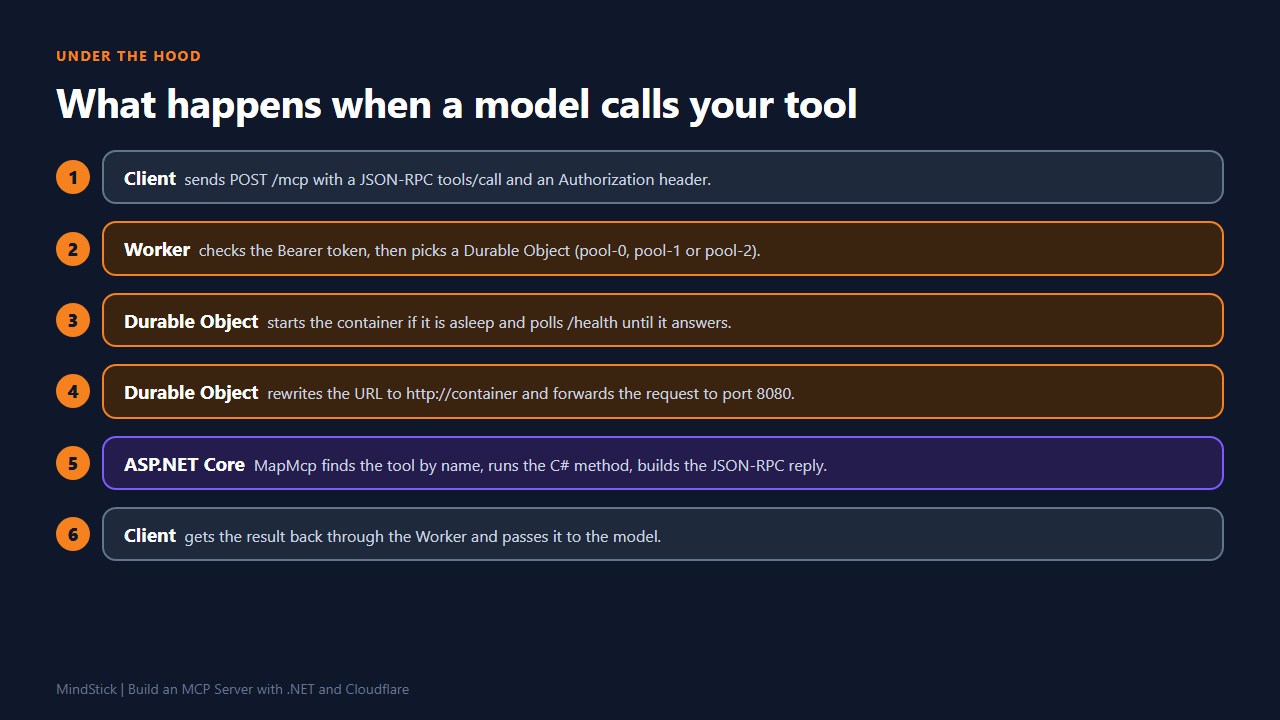
Before you test, here is what happens on every call. The client posts to the Worker, the Worker checks the key and picks an instance, the Durable Object starts the container if it is asleep and waits for
/health, the request is forwarded to port 8080, ASP.NET Core runs your C# method, and the reply travels back the same way.
Repeat your tools/list test, this time against the public address and with the key. The first call after a quiet period is slower, because the container has to start:
curl -X POST https://mindstick-mcp.<your-subdomain>.workers.dev/mcp \
  -H "Authorization: Bearer <your key>" \
  -H "Content-Type: application/json" \
  -H "Accept: application/json, text/event-stream" \
  -d '{"jsonrpc":"2.0","id":1,"method":"tools/list"}'
If you get the same four tools back that you saw locally, the whole chain works. A call without the header should return 401.
13. Step 10: Connect an AI app
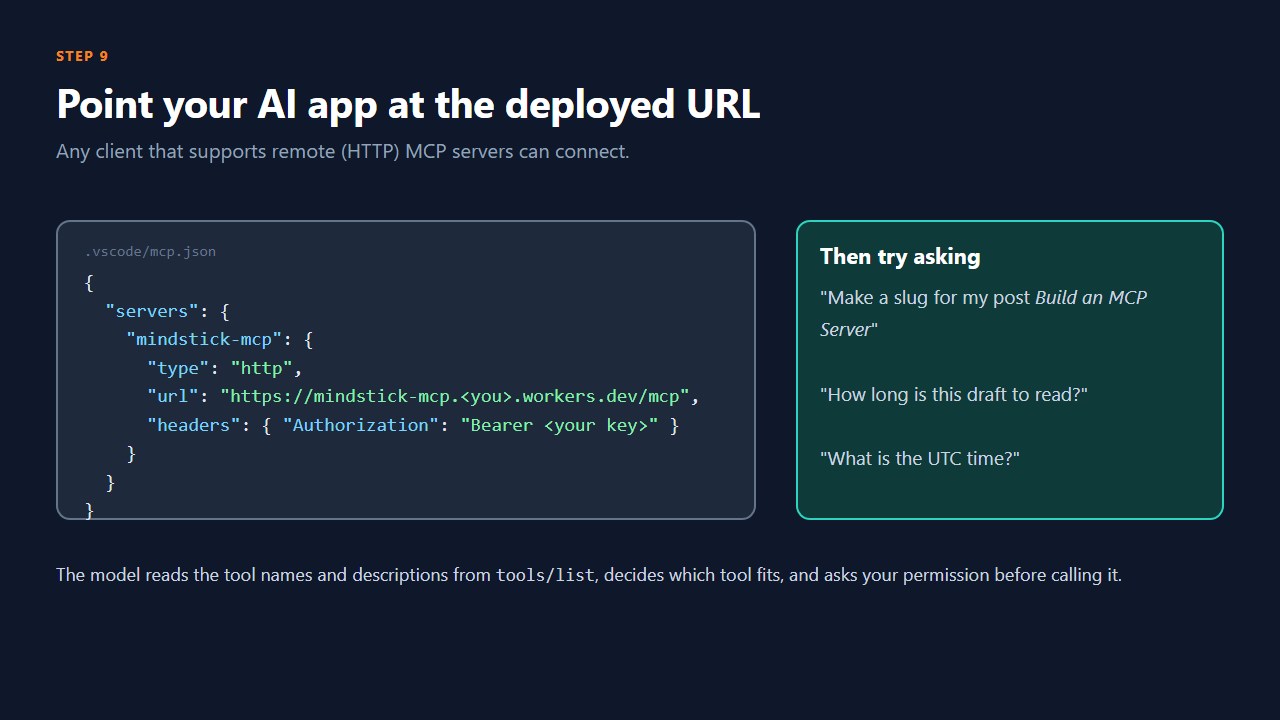
In VS Code, create .vscode/mcp.json in your project:
{
  "servers": {
    "mindstick-mcp": {
      "type": "http",
      "url": "https://mindstick-mcp.<your-subdomain>.workers.dev/mcp",
      "headers": { "Authorization": "Bearer <your key>" }
    }
  }
}
Open Copilot Chat, switch to Agent mode and check that mindstick-mcp is listed under Tools (start it if needed). Then ask something natural, such as "Make a slug for my post titled Build an MCP Server" or "How long would this paragraph take to read?". The model reads your tool descriptions, picks the right tool and asks your permission before running it. Other MCP clients that support remote HTTP servers take the same two things: the URL and the header.
Do not commit a real key into mcp.json in a shared repository. Use your client's input or secret feature if it has one.
14. How it behaves in real life
- Cold starts. After two idle minutes the container stops. The next request starts it again and the Worker waits for
/health, so the first call takes noticeably longer than later ones. Raise the idle timeout if that matters for your users. - Scaling. Three instances can run side by side. Because the server is stateless, you can change
POOL_SIZEfreely without breaking clients. - State. A container's memory and disk vanish when it stops. Anything that must persist (notes, user data) should live in a database or a Cloudflare storage service, not in a static variable.
- Cost. Containers are billed for the resources they use while running. Pricing was not something I verified for this guide, so read Cloudflare's current pricing page before you leave a server running at scale.
15. Security checklist
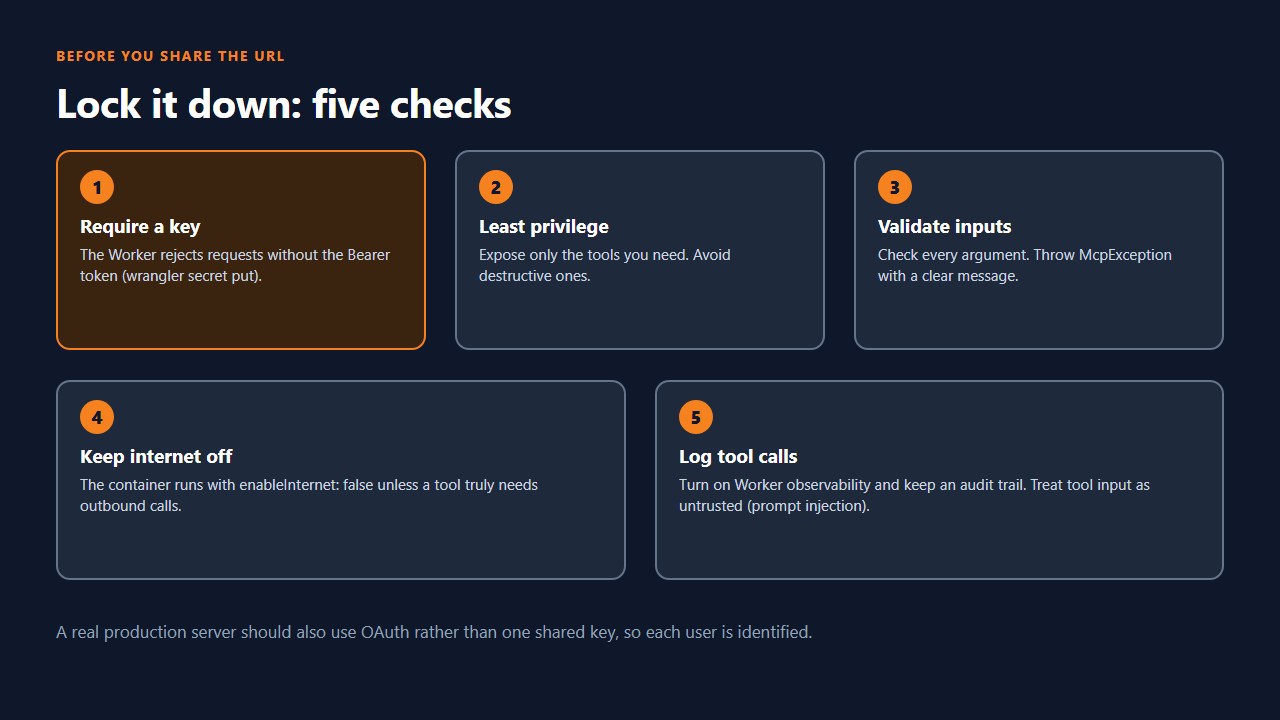
A public MCP server can run actions on behalf of an AI, so treat it like any internet-facing API.
- Require a key. We did this in the Worker. For anything real, move to OAuth so each person is identified. Cloudflare documents an OAuth setup for Workers.
- Least privilege. Expose only the tools you need. Be very careful with tools that delete or change data.
- Validate every input. Never trust arguments, since the text may come from a model that read untrusted content. Throw
McpExceptionwith a clear message on bad input. - Keep the internet off for the container unless a tool really must call out.
- Log tool calls so you have an audit trail, and remember that prompt injection is a real risk when an agent reads outside content.
The C# SDK documentation also advises limiting AllowedHosts for HTTP servers that run on a developer machine, to reduce DNS rebinding risk. In our setup the container is not reachable from outside, because only the Worker can talk to it.
16. Troubleshooting
- "Container is not listening to port 8080". The app has not finished starting. Retry. If it never works, check that
ASPNETCORE_URLSishttp://+:8080and that/healthresponds when you run the image yourself. - Deploy fails or hangs at the image step. Make sure Docker is running (
docker infoshould answer). Behind a VPN or TLS-inspecting proxy, image builds can fail with SSL errors, so disconnect briefly or add the proxy's certificate to the build. - Everything returns 401. The secret is missing or the header does not match exactly. Check
Authorization: Bearer <key>. - 502 from the Worker. Look at the logs with
npx wrangler tail. The usual cause is a container that crashed on start, so run the same Docker image locally to see the error. - GET to /mcp gives 405. That is expected in stateless mode. Clients use POST.
- Your own code does not update. Container code does not hot-reload in
wrangler dev. Pressrto rebuild, or runwrangler deployagain.
17. Recap and next steps
You built an MCP server in C# with three small files, proved it works with plain
curl, wrapped it in a two-stage Docker image, and deployed it behind a Worker that handles the key check, the startup and the routing. The important ideas to take away are:
- MCP is a standard way for AI apps to call your code, and descriptions are what the model uses to choose tools.
- Workers cannot run .NET, so Cloudflare Containers runs your app and a Worker plus a Durable Object sit in front.
- Stateless mode makes the server safe to run on many short-lived instances.
- Test locally, then in Docker, then in the cloud, one layer at a time.
From here, try replacing the blog tools with something of your own, such as a database lookup, then add OAuth, and add a resource or a prompt alongside the tools.
Sources and further reading
- MCP C# SDK: getting started
- Microsoft Learn: Deploy a .NET MCP server to Azure Container Apps
- Cloudflare Containers: get started
- Cloudflare Containers: local development
- Cloudflare Containers: limits and instance types
- Cloudflare: build a remote MCP server on Workers
- Cloudflare containers-template on GitHub
