---
title: "Implement Blob Storage Using Presigned URL in .NET Core and JavaScript"
description: "Uploading files through your backend server can create performance bottlenecks, especially for large files like images, videos, PDFs, or backups."
author: "Ravi Vishwakarma"
published: 2026-05-10
updated: 2026-05-11
canonical: https://answers.mindstick.com/blog/278/implement-blob-storage-using-presigned-url-in-dot-net-core-and-javascript
category: "software"
tags: ["software", "software development", ".net programming"]
reading_time: 6 minutes
---
# Implement Blob Storage Using Presigned URL in .NET Core and JavaScript
Uploading files through your backend server can create performance bottlenecks, especially for large files like images, videos, PDFs, or backups.
A better and scalable solution is using **Presigned URLs**.
With Presigned URLs:
- Backend generates a temporary upload URL
- Frontend uploads directly to blob storage
- Backend never handles file data
- Uploads become faster and more secure
In this blog, we will implement:
- ASP.NET Core Web API
- AWS S3 Blob Storage
- JavaScript Frontend
- Secure Upload using Presigned URL
## What is a Presigned URL?
A Presigned URL is a temporary secure URL generated by the backend that allows clients to upload files directly to [cloud](https://www.mindstick.com/services/cloud-development) storage.
The URL:
- Has expiration time
- Works for a specific file
- Prevents exposing cloud credentials

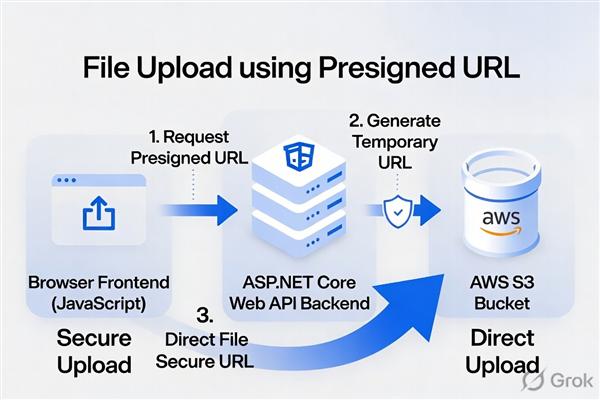
## Architecture
```plaintext
Frontend (JavaScript) | | Request Upload URL v ASP.NET Core Backend | | Generate Presigned URL v AWS S3 ^ | | Direct Upload | Frontend
```
## Benefits
- **Faster Uploads**
- Files go directly to storage.
- **Reduced Backend Load**
- Backend handles authentication only.
- **Better Scalability**
- Ideal for large applications.
- **Improved Security**
- URLs expire automatically.
## Technologies Used
- **Backend**
- [ASP.NET Core 8 Web API](https://www.mindstick.com/articles/333455/how-to-create-dot-net-core-api-provide-an-example)
- [AWS SDK for .NET](https://aws.amazon.com/sdk-for-net/)
- [S3 Storage](https://www.youtube.com/watch?v=hPmIuXcc4zc)
- **Frontend**
- [HTML](https://training.mindstick.com/courses/188/html-upcoming11)
- [JavaScript](https://training.mindstick.com/courses/187/javascript-upcoming9)
- [Fetch API](https://www.mindstick.com/forum/161986/how-do-you-handle-api-pagination-when-fetching-data)
## Step 1 — Create S3 Bucket
Create an S3 bucket from AWS Console.
Example bucket:
```plaintext
my-dotnet-upload-demo
```
## Step 2 — Configure CORS in S3
Bucket → Permissions → CORS
```plaintext
[ { "AllowedHeaders": ["*"], "AllowedMethods": ["PUT", "GET"], "AllowedOrigins": ["*"], "ExposeHeaders": [] } ]
```
For production, replace `"*"` with your frontend domain.
## Step 3 — Create ASP.NET Core Web API
Create project:
```cs
dotnet new webapi -n FileUploadApi
```
Move into project:
```cs
cd FileUploadApi
```
## Step 4 — Install AWS SDK
Install package:
```cs
dotnet add package AWSSDK.S3
```
## Step 5 — Configure appsettings.json
## appsettings.json
```javascript
{ "AWS": { "AccessKey": "YOUR_ACCESS_KEY", "SecretKey": "YOUR_SECRET_KEY", "Region": "ap-south-1", "BucketName": "my-dotnet-upload-demo" } }
```
## Step 6 — Create Request Model
## Models/UploadRequest.cs
```cs
namespace FileUploadApi.Models { public class UploadRequest { public string FileName { get; set; } public string FileType { get; set; } } }
```
## Step 7 — Create Upload Controller
## Controllers/UploadController.cs
```cs
using Amazon; using Amazon.S3; using Amazon.S3.Model; using Microsoft.AspNetCore.Mvc; using FileUploadApi.Models; namespace FileUploadApi.Controllers { [ApiController] [Route("api/[controller]")] public class UploadController : ControllerBase { private readonly IConfiguration _configuration; public UploadController(IConfiguration configuration) { _configuration = configuration; } [HttpPost("generate-url")] public IActionResult GenerateUploadUrl([FromBody] UploadRequest request) { var accessKey = _configuration["AWS:AccessKey"]; var secretKey = _configuration["AWS:SecretKey"]; var region = _configuration["AWS:Region"]; var bucketName = _configuration["AWS:BucketName"]; var s3Client = new AmazonS3Client( accessKey, secretKey, RegionEndpoint.GetBySystemName(region) ); var fileKey = $"uploads/{Guid.NewGuid()}-{request.FileName}"; var presignedRequest = new GetPreSignedUrlRequest { BucketName = bucketName, Key = fileKey, Verb = HttpVerb.PUT, Expires = DateTime.UtcNow.AddMinutes(1), ContentType = request.FileType }; string uploadUrl = s3Client.GetPreSignedURL(presignedRequest); var fileUrl = $"https://{bucketName}.s3.{region}.amazonaws.com/{fileKey}"; return Ok(new { UploadUrl = uploadUrl, FileUrl = fileUrl }); } } }
```
## Step 8 — Enable CORS in ASP.NET Core
## Program.cs
```cs
var builder = WebApplication.CreateBuilder(args); builder.Services.AddControllers(); builder.Services.AddCors(options => { options.AddPolicy("AllowAll", policy => { policy.AllowAnyOrigin() .AllowAnyMethod() .AllowAnyHeader(); }); }); var app = builder.Build(); app.UseCors("AllowAll"); app.MapControllers(); app.Run();
```
## Step 9 — Run Backend
```plaintext
dotnet run
```
Backend runs at:
```plaintext
https://localhost:5001
```
## Step 10 — Frontend HTML
## index.html
```html
File Upload Upload File Using Presigned URL
```
## Step 11 — Frontend JavaScript
## app.js
```javascript
async function uploadFile() { const fileInput = document.getElementById("fileInput"); if (!fileInput.files.length) { alert("Please select a file"); return; } const file = fileInput.files[0]; try { // Step 1: Get Presigned URL const response = await fetch( "https://localhost:5001/api/upload/generate-url", { method: "POST", headers: { "Content-Type": "application/json" }, body: JSON.stringify({ fileName: file.name, fileType: file.type }) } ); const data = await response.json(); // Step 2: Upload directly to S3 const uploadResponse = await fetch(data.uploadUrl, { method: "PUT", headers: { "Content-Type": file.type }, body: file }); if (uploadResponse.ok) { alert("File uploaded successfully!"); console.log("File URL:", data.fileUrl); } else { alert("Upload failed"); } } catch (error) { console.error(error); alert("Something went wrong"); } }
```
## How the Flow Works
## Step 1
Frontend requests upload URL:
```javascript
POST /api/upload/generate-url
```
## Step 2
Backend generates secure temporary URL:
```plaintext
s3Client.GetPreSignedURL(presignedRequest);
```
## Step 3
Frontend uploads file directly:
```javascript
fetch(uploadUrl, { method: "PUT", body: file })
```
## Validate File Types
Add validation inside controller:
```plaintext
var allowedTypes = new[] { "image/png", "image/jpeg", "application/pdf" }; if (!allowedTypes.Contains(request.FileType)) { return BadRequest("Invalid file type"); }
```
## Limit File Size
Frontend validation:
```javascript
const maxSize = 5 * 1024 * 1024; if (file.size > maxSize) { alert("File size exceeds limit"); return; }
```
## Recommended Security Practices
## Never Expose AWS Credentials
Keep credentials only on backend.
## Use Short Expiry
```plaintext
Expires = DateTime.UtcNow.AddMinutes(1)
```
## Use IAM Restricted Permissions
Only allow:
```plaintext
{ "Effect": "Allow", "Action": ["s3:PutObject"], "Resource": "arn:aws:s3:::my-dotnet-upload-demo/*" }
```
## Common Errors
## CORS Error
Fix:
- Configure S3 CORS correctly
- Enable backend CORS
## SignatureDoesNotMatch
Fix:
- Verify region
- Verify bucket name
- Check credentials
## AccessDenied
- Fix IAM policy permissions.
## Production Improvements
## Add Authentication
Allow only logged-in users to generate upload URLs.
## Store Metadata in Database
Store:
- File URL
- User ID
- Upload date
- File type
## Use CloudFront CDN
Improve global file delivery performance.
## Final Thoughts
Using Presigned URLs with ASP.NET Core is one of the best ways to build scalable and secure file upload systems.
Benefits include:
- Faster uploads
- Lower server load
- Better scalability
- Improved security
This architecture is widely used in:
- SaaS applications
- Social media platforms
- AI apps
- Video platforms
- Document systems
## Official Documentation
- [ASP.NET Core Documentation](https://learn.microsoft.com/aspnet/core/)
- [AWS SDK for .NET](https://aws.amazon.com/sdk-for-net/)
- [Amazon S3 Documentation](https://docs.aws.amazon.com/s3/index.html)
- [Presigned URL Guide](https://docs.aws.amazon.com/AmazonS3/latest/userguide/ShareObjectPreSignedURL.html)
---
Original Source: https://answers.mindstick.com/blog/278/implement-blob-storage-using-presigned-url-in-dot-net-core-and-javascript
Copyright © MindStick Software Pvt. Ltd. This Markdown version is provided for developers, AI systems, and offline reading.